ModifiersPluginとUtilityメソッド
ModifiersPluginはGSAPが適用する値をインターセプトしてその値をパラメーターにした新しい値を返します
*utils.unitize()は単位を取り除き結果に単位を追加しまます
<div style="width: 300px; height: 200px;border:solid 1px #ccc">
<div id="rect" style="width: 20px; height: 20px; background: blue;"> </div>
</div>
<script>
gsap.to("#rect", 5, {
  x: 280, y: 180,
  modifiers: {
      y: y => Math.sin(parseFloat(y) / 57.296) * 180 + "px"
   //y: gsap.utils.unitize(y => Math.sin(parseFloat(y) / 57.296) * 180)
  }
});
</script>スライダーを作ってみる
ModifiersPlugin(コアのプラグイン)で逆方向の動きをつけたり、Utilityメソッドのwrap()を使うとカウンターのロジックが簡単になります


おおまかな流れ
- cssでスライダーのアイテムのラッパーはvisibility: hidden;とopacity:0;にする
- gsap.set(‘ラッパー’, { autoAlpha: 1 }); gsap.set(‘スライダーのアイテム’, { x: ‘-100%’ })をセットする
- スライダーがINする時のタイムラインfromTo:(x: ‘-100%’,autoAlpha: 0, からx:0 ,autoAlpha: 1)
- スライダーがOUTする時のタイムラインto: (x:300, autoAlpha: 0)へ
- outからinへのトランジションのタイムライン(add(out).add(in))
add()メソッドを使用すると、タイムラインの任意の場所にトゥイーン、タイムライン、ラベル、コールバックを追加できます。 - 初めにINのタイムライン 、そのあとはクリックイベントでトランジションのタイムラインが発火する
INのタイムラインで背景色も変化させる
onStart :アニメーションの開始時に呼び出す関数
onStartParams :onStartの関数の引数を配列で設定します
//INのタイムラインを返す関数
function timeLineIn(index){
//スライダーに0から連番のclass名を付けておく
const el = document.querySelector(`div.item${index}`);
const tlIn = gsap.timeline();
        tlIn.fromTo(el, {
        x: '-100%',
        autoAlpha: 0,
        }, {
        duration: 0.7,
        x: 0,
        autoAlpha: 1,
        onStart: updateClass,
        onStartParams: [`no-${index}`],
        })
 return tlIn;
}
//アニメーション開始時に背景色をつけるラッパー要素にクラスを追加する
function updateClass(parame) {
    document.querySelector('.wrapper').className = `wrapper ${parame}`;
}
utils.wrap()は数値を指定された範囲に配置し、最大値を超えると最初に折り返され、最小値よりも小さい場合は最後に折り返されるようにします
  let currentIndex = 0;
  const totalItems = document.querySelectorAll('.item').length;
  const wrapper = gsap.utils.wrap(0, totalItems);

//カウントの値が最後なら0に
 const nextIndex = wrapper(currentIndex + 1);
//カウントの値が0なら最終の値に
 const prevIndex = wrapper(currentIndex - 1);
ModifiersPluginを利用してprevボタンを押した時は、INとOUTの逆方向のアニメーションを作成します
またutils.unitize()でフィードするときに単位を取り除き、結果に単位を追加します
//INのタイムラインを返す関数
function timeLineIn(direction, index) {
//引数が'prev'ならtrue
    const prev = direction === 'prev';
    const el = document.querySelector(`div.item${index}`);
    const button = el.querySelector('.to-section');
    const tlIn = gsap.timeline({
//画像とSECTIONへのボタン共通なのでdefaults
        defaults: {
            // 逆方向
            modifiers: {
                x: gsap.utils.unitize(function(x){
                    return prev ? Math.abs(x) : x;
            })
            }
         }
         });
        tlIn.fromTo(el, {
        x: '-100%',
        autoAlpha: 0,
        }, {
        duration: 0.7,
        x: 0,
        autoAlpha: 1,
        onStart: updateClass,
        onStartParams: [`no-${index}`],
        })
        .from(button, { duration: 0.2, x:-20, autoAlpha: 0 })
        return tlIn;
}
//OUTのタイムラインを返す関数
function timeLineOut(direction, index) {
  const prev = direction === 'prev';
  const el = document.querySelector(`div.item${index}`);
  const tlOut = gsap.timeline();
    tlOut.to(el, {
        duration: 0.7,
        x: 300,
        autoAlpha: 0,
        // 逆方向
        modifiers: {
            x: gsap.utils.unitize(function (x) {
                return prev ? -x : x;
         })
        }
    })
    return tlOut;
}
アニメーション中かの判別
function isTweening() {
    return gsap.isTweening('.item');
}
コードを見る
<div class="wrapper">
   <div class="items">
        <button class="btn prev"><span class="screen-reader-text">Prev</span></button>
        <button class="btn next"><span class="screen-reader-text">Next</span></button>
      <div class="item item0">
           <div class="item-image">
               <img src="https://koro-koro.com/wp-content/uploads/2022/05/1.png" alt="">
            </div>
          <p class="to-section"><a href="#" class="button" target="_blank" rel="noopener">SECTION 1</a></p>
      </div>
      <div class="item item1">
         <div class="item-image">
             <img src="https://koro-koro.com/wp-content/uploads/2022/05/2.png" alt="">
         </div>
          <p class="to-section"><a class="button" href="#" target="_blank" rel="noopener">SECTION 2</a></p>
      </div>
      <div class="item item2">
         <div class="item-image">
             <img src="https://koro-koro.com/wp-content/uploads/2022/05/3.png" alt="">
         </div>
         <p class="to-section"><a class="button" href="#" target="_blank" rel="noopener">SECTION 3</a></p>
      </div>
    <div class="item item3">
         <div class="item-image">
             <img src="https://koro-koro.com/wp-content/uploads/2022/05/5.png" alt="">
         </div>
         <p class="to-section"><a class="button" href="#" target="_blank" rel="noopener">SECTION 4</a></p>
      </div>
   <div class="item item4">
        <div class="item-image">
             <img src="https://koro-koro.com/wp-content/uploads/2022/05/4.png" alt="">
        </div>
        <p class="to-section"><a class="button" href="#" target="_blank" rel="noopener">SECTION 5</a></p>
     </div>
   </div>
</div>
.wrapper{ overflow-x: hidden;}
.wrapper.no-0 {background-color: #9a63b4;}
.wrapper.no-1 {background-color: #cf7836;}
.wrapper.no-2 {background-color: #2e82b9;}
.wrapper.no-3 {background-color: #2e6a19;}
.wrapper.no-4 {background-color: #e4b640;}
.items {
width: 90%;
margin: 0 auto;
height: calc(25vh + 250px);
position: relative;
visibility: hidden;
opacity:0;
}
.item {
text-align: center;
position: absolute;
top: 0;
left: 0;
bottom: 0;
right: 0;
}
.item-image,
.item-image img{border-radius: 50%;}
.item-image {
position: relative;
width: 250px;
height: 250px;
margin: 5vh auto 0 auto;
}
.item-image img {
position: relative;
display: block;
}
.button-container {
position: relative;
}
a.button {
text-decoration: none;
width: 150px;
display: inline-block;
margin: 0 auto;
color: rgba(255,255,255,0.7);
padding: 8px 0;
border: 1px rgba(255,255,255,1) solid;
border-radius: 2px;
}
button.btn {
display: block;
width: 70px;
height: 70px;
background-color: transparent;
border: none;
color: rgba(255,255,255,0.7);
border-radius: 50%;
transition: all 0.3s linear;
overflow: hidden;
position: absolute;
top: 25vh;
z-index: 1;
}
button.btn.next {
left: auto;
right: 0;
}
button.btn:hover,
button.btn:focus,
button.btn:active {
outline: none;
background-color: rgba(0,0,0,0.4);
border-radius: 50%;
cursor: pointer;
}
button.btn:before {
content: "2039";
display: block;
position: absolute;
top: -13px;
font-size: 70px;
font-weight: 300;
}
button.btn.prev:before {
content: "2039";
left: 23px;
}
button.btn.next:before {
content: "203a";
left: 28px;
}
.dots {
display: flex;
align-items: center;
justify-content: center;
position: absolute;
bottom: 2vh;
left: 0;
right: 0;
top: auto;
}
.dot {
overflow: hidden;
background-color: rgba(255,255,255,0.2);
width: 20px;
height: 20px;
text-indent: -9999em;
border: none;
border-radius: 50%;
transition: all 0.3s linear;
margin: 0 8px;
cursor: pointer;
}
.dot:focus,
.dot:active,
.dot:hover {
outline: none;
background-color: rgba(255,255,255,0.6);
}
.dot.active {
background-color: rgba(0,0,0,0.4);
}//INのタイムラインを返す関数
function timeLineIn(direction, index) {
const prev = direction === 'prev';
const el = document.querySelector(`div.item${index}`);
const button = el.querySelector('.to-section');
const tlIn = gsap.timeline({
defaults: {
modifiers: {
x: gsap.utils.unitize(function(x){
return prev ? Math.abs(x) : x;
})
}
}
});
tlIn.fromTo(el, {
x: '-100%',
autoAlpha: 0,
}, {
duration: 0.7,
x: 0,
autoAlpha: 1,
onStart: updateClass,
onStartParams: [`no-${index}`],
})
.from(button, { duration: 0.2, x:-300, autoAlpha: 0 })
return tlIn;
}
//INアニメーション開始時のコールバック
function updateClass(parame) {
document.querySelector('.wrapper').className = `wrapper ${parame}`;
}
//OUTのタイムラインを返す関数
function timeLineOut(direction, index) {
const prev = direction === 'prev';
const el = document.querySelector(`div.item${index}`);
const tlOut = gsap.timeline();
tlOut.to(el, {
duration: 0.7,
x: 300,
autoAlpha: 0,
modifiers: {
x: gsap.utils.unitize(function (x) {
return prev ? -x : x;
})
}
})
return tlOut;
}
//トランジションのタイムラインを返す関数
function timeLineTransition(direction, toIndex) {
const tlTransition = gsap.timeline();
tlTransition
.add(timeLineOut(direction, currentIndex))
.add(timeLineIn(direction, toIndex));
// アニメーションの開始時に呼び出す関数
onStart: updateCurrentIndex(toIndex)
return tlTransition;
}
//トランジションアニメーション開始時のコールバック
function updateCurrentIndex(toIndex) {
currentIndex = toIndex;
//ドットにactiveクラスをつける
document.querySelectorAll('.dot').forEach(function (el, index) {
el.setAttribute('class', 'dot')
if (index === currentIndex) {
el.classList.add('active')
}
})
}
//アニメーション中かを判別
function isTweening() {
return gsap.isTweening('.item');
}
//ドットを作成する関数
function createDot() {
const newDiv = document.createElement('div');
newDiv.setAttribute('class', 'dots');
for (let index = 0; index < totalItems; index++){
const element = document.createElement('button');
const text = document.createTextNode(index);
element.appendChild(text);
element.setAttribute('class', 'dot');
if (currentIndex === index) {
element.classList.add('active')
}
//クリックされた時
element.addEventListener('click', function () {
if (!isTweening()) {
const direction = index > currentIndex ? 'next' : 'prev'
timeLineTransition(direction, index);
}
})
newDiv.appendChild(element);
}
document.querySelector('.items').appendChild(newDiv);
}
//set
gsap.set('.items', { autoAlpha: 1 });
gsap.set('.item', { x: '-100%' })
let currentIndex = 0;
const totalItems = document.querySelectorAll('.item').length;
const wrapper = gsap.utils.wrap(0, totalItems);
//最初のスライダーがINする
timeLineIn('next', currentIndex)
//ドット
createDot()
//次へのボタンが押された時
document.querySelector('button.next').addEventListener('click', function (e) {
e.preventDefault();
const nextIndex = wrapper(currentIndex + 1);
!isTweening() && timeLineTransition('next', nextIndex);
})
//前へのボタンが押された時
document.querySelector('button.prev').addEventListener('click', function(e){
e.preventDefault();
const prevIndex = wrapper(currentIndex - 1);
!isTweening() && timeLineTransition('prev', prevIndex);
})UtilityメソッドのtoArray
UtilityメソッドのtoArrayはほとんどすべての配列のようなオブジェクトを配列に変換します
mousemoveイベントで遊んでみる
gsap.utils.toArrayは、document.querySelectorAllの代わりに使っています
*親の要素のCSSには、perspective: 1000pxを設定して奥行きを出します
document.querySelector('.images').addEventListener('mousemove', moveImges)
function moveImges(e) {
//offsetX,Y イベントが発生した要素上のX座標とY座標
    const { offsetX, offsetY, target } = e
    const { clientWidth, clientHeight } = target

    const xPos = (offsetX / clientWidth) - 0.5;
    const yPos = (offsetY / clientHeight) - 0.5;

    const images = gsap.utils.toArray('.image')
    images.forEach((image, index) => {
        gsap.to(image, {
            duration: 1.2,
            x: xPos * 20 *(index + 0.5),
            y: yPos * 100 * (index * 1.5 + 0.5),
            rotationY: xPos * 100,
            rotationX: yPos * 10,
            ease:'Power3.out'
        });
    })
}
HTML・CSSを見る
<style>
.g_gallery{
  overflow:hidden;
  position: relative;
  height: 700px;
  margin: 20px auto;
  max-width: 350px;
  border: solid 1px rgba(0,0,0,0.1);
}
.g__images{perspective: 1000px;}
.g__image{
  position: absolute;
  top: 0;
  left: 0;
  pointer-events: none;
  width: 200px;
  padding-bottom: 250px;
  opacity: 0.8;
}
.g__image img{
  top: 0;
  left: 0;
  width: 100%;
  height: 100%;
  position: absolute;
  object-fit: cover;
  object-position: 50% 50%;
}
.img-1{
  top: 20px;
  left: 0;
  }
.img-2{
  top: 50px;
  left: 100px;
  }
.img-3{
  top:  100px;
  left: 150px;
  }
.img-4{
   top: 250px;
   left: 100px;
   }
.img-5{
  top: 300px;
  left: 0;
  }
</style>
<div class="g_gallery">
      <div class="g__images">
        <div class="g__image img-1">
              <img src="https://koro-koro.com/wp-content/uploads/2022/05/01.png">
        </div>
        <div class="g__image img-2">
              <img src="https://koro-koro.com/wp-content/uploads/2022/05/02.png">
       </div>
       <div class="g__image img-3">
             <img src="https://koro-koro.com/wp-content/uploads/2022/05/03.png">
       </div>
       <div class="g__image img-4">
            <img src="https://koro-koro.com/wp-content/uploads/2022/05/04.png">
       </div>
       <div class="g__image img-5">
            <img src="https://koro-koro.com/wp-content/uploads/2022/05/05.png">
       </div>
    </div>
 </div>
PC(マウスイベント)

ScrollTriggerプラグイン
スクロール位置に基づいてアニメーションを制御できます
スクロールの開始と終了の位置、ピン止め(スクロール中に要素を固定)、スクラブ(スクロール位置とアニメーションの進行を連動)など、多岐にわたるオプションと設定があります
備考:IntersectionObserverとの違い
IntersectionObserverはスクロールに関係なく要素がいつ出入りするかを監視します
要素がビューポートまたは特定の要素と交差するかどうかを監視するためのWeb APIです
ScrollTriggerは、アニメーションの高度な制御とスクロールとの連動を重視しています。
IntersectionObserverは、要素がビューポートと交差するかどうかのシンプルな監視を目的としており、アニメーションに特化していません
IntersectionObserverとScrollTrigger を一緒に使用することもできます
<script src="https://cdnjs.cloudflare.com/ajax/libs/gsap/3.10.4/gsap.min.js"></script>
<script src="https://cdnjs.cloudflare.com/ajax/libs/gsap/3.10.4/ScrollTrigger.min.js"></script>
<script>
gsap.registerPlugin(ScrollTrigger);
</script>オンの時にCSSクラスを追加しオフの時にCSSクラスを外したい場合はset()を使います
*toggleClass(クラスを要素に追加/削除)
  gsap.set('#target', {
        scrollTrigger: {
            trigger: '#target',
            start: 'top bottom-=150',
            end: 'bottom center-=150',
            toggleClass: 'active',     //activeクラス
            //トリガー以外の要素のクラスを切り替える
       //toggleClass: {targets: "body", className: "active"}
            markers: true
        }
})デバックにはmarkers:trueを設定すると便利です
ScrollTrigger.createはScrollTriggerインスタンスを作成します
100pxスクロールした時に、bodyにis-fixedクラスをつける場合は、これだけでOK
gsap.registerPlugin(ScrollTrigger);
ScrollTrigger.create({
        start: 100,
//endがないと最後までスクロールした時にクラスが外れる
        end: 'bottom bottom-=100',
        toggleClass: {
            targets: 'body',
            className: 'is-fixed'
        }
    })
UtilityメソッドのtoArrayでセクションを取得
セクションごとにアニメーションをつけます
最もシンプルな例が
ビューポートのボトムにトリガー要素のトップが現れた時にクラスをつける
ビューポートのトップにトリガー要素のボトムが現れた時にクラスが外れる
*要するにトリガー要素が、ビューポートに入っている間はクラスがついている状態です
gsap.registerPlugin(ScrollTrigger);
//toArrayを使うことで、配列として扱えます
const allSections = gsap.utils.toArray('section');
    allSections.forEach((section, index) => {
    gsap.set(section, {
            scrollTrigger: {
         trigger: section,
              toggleClass: 'active',
//idはマーカーに追加表示されます(ScrollTrigger.getById()で取得もできる)
              id: `sec-${index+1}`,
              markers: true
           }
       })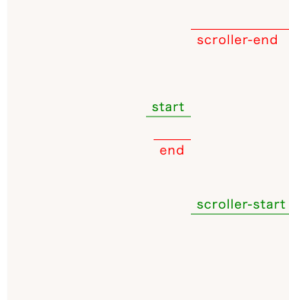
})startとendでスクローラーを調節できます"トリガーの位置 ビューポートの位置"
マイナス(-)上方向 プラス(+)下方向
数値だけのときは上基準
scrollTrigger: {
 trigger: section,
 toggleClass: 'active',
//トリガーの上部がビューポートのボトムから250px上
  start: "top bottom-=250px",
//トリガーに下部がビューポートの上部から250px下
  end: "bottom 250px",
} 「スクローラー」は、スクロールイベントの発生源となるエレメントです
通常はブラウザのビューポートがスクローラーとなりますが、ScrollTriggerでは特定のdiv要素などのエレメントをカスタムスクローラーとして定義することもできます。
カスタムスクローラーの使用例
my-scroll-containerというIDを持つエレメントがスクローラーとして設定されており、そのエレメント内でスクロールイベントが発生した場合にトリガーが発動します
ScrollTrigger.create({
  trigger: ".my-element",
  scroller: "#my-scroll-container",
  // その他の設定...
});
「ターゲット」は、スクロールイベントによって何らかの変化が起きるエレメントです
アニメーションやピン留めなどの効果がターゲットエレメントに適用されます
ターゲットエレメントを定義するためには、triggerプロパティを使用し、そのエレメントがビューポート内に入ったとき、または特定の位置に達したときにどのような挙動をするかを設定します
ScrollTrigger.create({
  trigger: ".my-element",
  start: "top center",
  // その他の設定...
});- start
- ScrollTriggerの開始位置(スクローラーの上部/左側が基準です)
*スクローラーのデフォルトはビューポートです - 文字列
“top center”:トリガーの上部がビューポートの中央に当たったとき
“top bottom-=100px”:トリガーの上部がビューポートの下部から100px上に当たったとき
数値
200 などの値を使用すると、ビューポートが200ピクセルスクロールされたときにトリガーが発動
- end
- ScrollTriggerの終了位置
- 文字列
“bottom center”:endTriggerの下部がビューポートの中央に当たったとき終了
“center 100px”:endTriggerの中心がビューポート上部から100px下に当たったとき終了
“+=500” :開始位置から 500pxスクロールして終了
数値
200 などの値を使用すると、ビューポートが200ピクセルスクロールされたときにトリガーが終了
- endTrigger
- trigger要素と同じ位置でアニメーションが終了する場合は不要です
アニメーションの終了位置をトリガー要素とは異なる要素に基づいて計算したい場合には、endTriggerを定義します
- scrub
- スクロールの位置とアニメーションの進捗を直接リンクさせる機能です。スクロールバーが動くと、アニメーションも同じ速度で動きます。このオプションを設定すると、スクロールの動きに合わせてアニメーションが「擦る」ように動く感じが生まれます。滑らかな動きを作りたい場合は、数値を設定して滑らかに遷移する時間を制御できます
- snap
- アニメーションが特定のポイントに「止まる」挙動を作る機能です。ユーザーがスクロールを停止した後、アニメーションは最も近い進捗値に自動的に整列します。例えば、セクションごとにスナップを設定すると、スクロール停止時にそのセクションの始点や終点に自動的に合わせられます
+-------------------+
| Viewport          |
|     +---------+   |
|     | Trigger |   |
|     +---------+   |
+-------------------+
動的に変化する値や状態に基づいてstartやendの値を計算することができます
ScrollTrigger.create({
  start: function(self) {
    // トリガー要素の高さに基づいてスタート位置を計算
    return self.trigger.offsetTop + 100;
  },
  // 他のプロパティとオプション
});- 一度だけのアクション: once
一度だけアニメーションを実行したい場合に利用します。 - ビューに入ったときのアクション: onEnter
要素が画面に表示されたときの動作を制御します。 - ビューに戻ったときのアクション: onEnterBack
ユーザーがページを上にスクロールして戻った際の動作を定義します。 - ビューから出たときのアクション: onLeave
要素が画面から外れたときの動作を制御します。 - ビューから完全に戻ったときのアクション: onLeaveBack
ユーザーがページの最上部に戻ったときの動作を制御します。
pin
特定の位置で要素を固定してアニメーションできます
*pinはposition: fixedが付与されます
const allSections = gsap.utils.toArray('.g-wrap');
    allSections.forEach((section, index) => {
    ScrollTrigger.create({
        trigger: section,
        start: "top center", //triggerで指定した要素が固定
        end: "bottom center",//どこまで固定させるか
        pin: true,
        pinSpacing: false,
    })
})pinSpacing
pinを設定すると終わったタイミングで下にある要素を下げるのでpadding-bottomがつきます
*要素の固定が解除されたときに追いつくためpinSpacing:false でパディング無しにできます
<img>にwidthやheight属性がない場合などで、高さが反映されない時があります
その時は、ScrollTrigger.refresh()で、ラッパー要素を生成し直してくれます
ターゲットをアニメーションする
gsap.to(".box", 3,{  //アニメーションしたい要素を指定
  scrollTrigger: ".box"  //トリガーとなる要素
  x: 500
});
gsap.fromToを使えば初期状態から連続して書けます
sap.fromTo('.box', { autoAlpha: 0, }, {
    autoAlpha: 1,
    scrollTrigger: {
      trigger: '.box',
      start: 'top center'
    }
  }
});
toggleActions
領域に出入りするときのトリガー(onEnter、onLeave、onEnterBack、onLeaveBack )に対してアニメーションのアクションを指定
*play再生・pause一時停止・resume中断していたことを再開・resetリセット・restart再起動・complete完了・reverse反転・none何も指定しない
デフォルトはtoggleActions:"play none none none"
toggleActions: “play pause resume reset”だと入るときにアニメーションを再生し、出るときに一時停止し、再び逆方向に入るときに再開し、最初から最後までスクロールするとリセットします
gsap.to(".box", 3,{
  scrollTrigger: {
    trigger: ".box",
    start: "top center", //四角形の上部がビューポートの中央から
    end: "top 100px", //四角形の上部がビューポートの上部から200px下
    toggleActions: "play pause resume reset",
  },
  x: 270,
  rotation: 360,
});スクラブアニメーション(スクロールと連動して少しずつ動くアニメーション)は、scrubにtureか数値、endでスクロールがどこまで進んだらアニメーションを終了させるか指定
scrubの数値が大きいほど動きが遅れます
*scrub: 1は追いつくのに 1秒かかります
gsap.to("#rect3", 3,{
  scrollTrigger: {
    trigger: "#rect3",
    start: "top center",
    end: "top 200px",
    scrub: true,
  },
  x: 270,
  rotation: 360,
});
タイムライン全体に追加(ドキュメントの例)
let tl = gsap.timeline({
// タイムライン全体に追加できます
    scrollTrigger: {
      trigger: ".container",
//アクティブなときにトリガー要素を固定します
      pin: true,
// トリガーの上部がビューポートの上部に当たったとき
      start: "top top",
// 開始を500px超えてスクロールした後に終了
      end: "+=500",
//スムーズスクロール 「追いつく」のに1秒かかります
      scrub: 1,
      snap: {
// タイムラインで最も近いラベルにスナップします
        snapTo: "labels",
// スナップアニメーションは0.2秒以上、3秒以下である必要があります(速度によって決定されます)
        duration: {min: 0.2, max: 3},
// スナップを実行する前に、最後のスクロールイベントから0.2秒待機します
        delay: 0.2,
// スナップアニメーションのイージング
        ease: "power1.inOut"
      }
    }
  });

//タイムラインにアニメーションとラベルを追加する
tl.addLabel("start")
  .from(".box p", {scale: 0.3, rotation:45, autoAlpha: 0})
  .addLabel("color")
  .from(".box", {backgroundColor: "#28a92b"})
  .addLabel("spin")
  .to(".box", {rotation: 360})
  .addLabel("end");
スクロールなどの動作に応じて、要素を異なるスピードで動かします
コードを見る
<div class="gsap-parallax">
    <div class="gsap-img"></div>
     <div class="gsap-content">
       <h1>Parallax</h1>
        <p>Lorem ipsum dolor sit amet, consectetur adipiscing elit. Nullam in dui mauris. Vivamus hendrerit arcu sed erat molestie vehicula. Sed.</p>
    </div>
</div>
.gsap-parallax {
color: #fff;
background-color: #000;
text-align: center;
position: relative;
overflow: hidden;
}
.gsap-img {
background: url('') no-repeat;
background-size: cover;
position: absolute;
width: 100%;
height: 150%;
top: 0;
z-index: 1;
opacity: 0.7;
}
.gsap-content {
width: 90%;
margin: 0 auto;
position: relative;
z-index: 2;
}gsap.registerPlugin(ScrollTrigger);
const parallaxTl = gsap.timeline({
ease: 'none',
scrollTrigger: {
trigger: '.gsap-parallax',
start: 'top bottom',
scrub: true
}
});
parallaxTl
//autoAlphaはopacityとvisibilityを組み合わせたような形で表示非表示の変更に使える
.from('.gsap-content', { duration: 1, autoAlpha: 0 }, 1)
.from('.gsap-img', {duration:3, y: '-50%'}, 0)Parallax
Lorem ipsum dolor sit amet, consectetur adipiscing elit. Nullam in dui mauris. Vivamus hendrerit arcu sed erat molestie vehicula. Sed.
参考:ドキュメントの下にあるDemos
gsap.matchMedia
特定のメディア クエリが一致した場合にのみ実行される関数にコードを組み込めます
let mm = gsap.matchMedia();

// メディアクエリを追加
mm.add("(min-width: 800px)", () => {
  // 800px 以上の場合にのみ実行
  gsap.to(...);
  gsap.from(...);
  ScrollTrigger.create({...});
  return () => { // オプション
    // クリーンアップコード(一致が停止したときに実行するコード)
  };
});
// すべてのアニメーション(ScrollTriggers) を元に戻すとき
mm.revert();
let mm = gsap.matchMedia(),
breakPoint = 800;
mm.add({
isDesktop: `(min-width: ${breakPoint}px)`,
isMobile: `(max-width: ${breakPoint - 1}px)`,
reduceMotion: "(prefers-reduced-motion: reduce)"
}, (context) => {
// 一致するかどうか
let { isDesktop, isMobile, reduceMotion } = context.conditions;
gsap.to(".box", {
rotation: isDesktop ? 360 : 180,
duration: reduceMotion ? 0 : 2
});
return () => { //オプション
// 条件が一致しなくなったときに呼び出されるクリーンアップ関数を返します
}
}); ScrollTrigger.matchMediaでブレークポイントを指定すると、ブレークポイントに応じたスクローラーでトリガーされます
ScrollTrigger.matchMedia({
    "(min-width:1025px)": function() {

    },
    "all": function() {
        // 全てに適応
    }
})
ScrollToPlugin
<script src="https://cdnjs.cloudflare.com/ajax/libs/gsap/3.10.4/gsap.min.js"></script>
<script src="https://cdnjs.cloudflare.com/ajax/libs/gsap/3.11.3/ScrollToPlugin.min.js"></script>
<script>
gsap.registerPlugin(ScrollToPlugin);
</script>
ウィンドウのスクロール位置またはDOM要素への移動をアニメーション化します
ウィンドウの特定の位置にスクロールするには、windowをターゲットとして使用します
//400ピクセル下にスクロール
gsap.to(window, {duration: 2, scrollTo: 400});
//idがsection1にスクロール
gsap.to(window, {duration: 2, scrollTo: "#section1"});
ページ内リンク
 <ul class="scroll-to">
    <li><a href="#stage1">STAGE1</a></li>
    <li><a href="#stage2">STAGE2</a></li>
    <li><a href="#stage3">STAGE3</a></li>
 </ul>
 <section id="stage1">STAGE1</section>
 <section id="stage2">STAGE2</section>
 <section id="stage3">STAGE3</section>
gsap.utils.toArray('scroll-to a').forEach(link=>{
const target = link.getAttribute('href')
link.addEventListener('click', (e)=>{
e.preventDefaule();
gsap.to(window,2,{scrollTo: target, ease:'Power2.out'})
})
})