こちらのYoutubu動画(Unity)を見ながらThree.jsで実装しました
https://www.youtube.com/watch?v=EBrAdahFtuo
セットアップ

THREE.PlaneGeometry(平面)を利用してスクリーンスペースに描画(カメラやモデルの位置に関係なくcanvas要素に対して直接描画)
*特別なカメラ設定は不要、最低限のカメラを設定してシーンに追加
*canvas要素のアスペクト比によって変形
*THREE.PlaneGeometry(2, 2)でcanvas要素の全体をカバー
<canvas class="webgl"></canvas>
<style>
*{
    margin: 0;
    padding: 0;
}
html,body{
    overflow: hidden;
}
.webgl{
    position: fixed;
    top: 0;
    left: 0;
    outline: none;
}
</style>
import * as THREE from 'three'
import vertexShader from './vertex.glsl'
import fragmentShader from './fragment.glsl'
const canvas = document.querySelector('.webgl')
//Sizes
const sizes = {
width: window.innerWidth,
height: window.innerHeight
}
const scene = new THREE.Scene()
const material = new THREE.ShaderMaterial({
vertexShader: vertexShader,
fragmentShader: fragmentShader,
wireframe: true, //試しにワイアーフレームで表示、後で削除
uniforms:{
uTime: { value: 0 },
uResolution: {value: new THREE.Vector2(sizes.width, sizes.height) },
}
})
const geometry = new THREE.PlaneGeometry(1.5,1.5) //2で全画面
const mesh = new THREE.Mesh(geometry, material)
scene.add(mesh)
const camera = new THREE.Camera();
scene.add(camera)
const renderer = new THREE.WebGLRenderer({
canvas: canvas,
})
function handleResize(){
sizes.width = window.innerWidth
sizes.height = window.innerHeight
renderer.setSize(sizes.width, sizes.height)
renderer.setPixelRatio(Math.min(window.devicePixelRatio, 2))
material.uniforms.uResolution.value.set(sizes.width, sizes.height);
}
const clock = new THREE.Clock()
const tick = () =>{
const elapsedTime = clock.getElapsedTime()
material.uniforms.uTime.value = elapsedTime
renderer.render(scene, camera)
window.requestAnimationFrame(tick)
}
handleResize()
tick()
window.addEventListener('resize', handleResize)varying vec2 vUv;
void main(){
gl_Position = vec4(position, 1.0);
vUv = uv;
}uniform vec2 uResolution;
uniform float uTime;
varying vec2 vUv;
void main() {
/*
uResolutionを使用してウィンドウの縦横のサイズを管理するのは
シェーダーが異なる解像度や画面サイズに対応してエフェクトの一貫性を保つため
*/
vec2 uv = (vUv * 2.0 - 1.0) * vec2(uResolution.x / uResolution.y, 1.0);
vec4 col = vec4(1.0, 0.0, 0.0, 1.0);// 赤色
gl_FragColor = col;
}備考:シェーダーファイル(.glsl)はViteの開発環境で「vite-plugin-glsl」をインストールして分離していますが、テンプレートリテラルを使用してシェーダーコードを直接JavaScriptファイルに書くこともできます
const vertexShader = `

`;

const fragmentShader = `

`;
フラグメントシーダーで雨粒の動きを実装
fract関数(小数部分だけを返す)を使って、繰り返しパターンを生成
*uvにfract関数を適用すると各座標成分の小数部分が得られる
*uvをスケールすることでパターンが元のサイズのスケール倍繰り返される
uniform vec2 uResolution;
uniform float uTime;
varying vec2 vUv;
void main() {
vec4 col = vec4(1.0, 0.0, 0.0, 1.0); //初期カラーを赤
// UV座標を[-1, 1]の範囲に変換し、アスペクト比を考慮して調整
vec2 uv = (vUv * 2.0 - 1.0) * vec2(uResolution.x / uResolution.y, 1.0);
//UV座標をスケール(パターンが元のサイズのスケール倍繰り返される)
float s = 2.0;
//x軸方向に2倍、y軸方向に1倍にスケーリング
vec2 aspect = vec2(2.0, 1.0);
uv = uv * s * aspect;
// - 0.5することで範囲を[0, 1]から[-0.5, 0.5]に変換
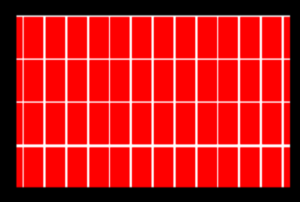
vec2 gv = fract(uv) - 0.5;
//条件に応じて色を白に変更 枠線部分
if(gv.x>0.4 || gv.y > 0.45) col =vec4(1.0, 1.0, 1.0, 1.0);
gl_FragColor = col;
}雨粒を描画するsmoothstep(A, B, x):xがA以下のとき0を、B以上のとき1を返し、AとBの間では滑らかに0から1へ補間length():ベクトルの長さ(原点からの距離)を計算しますlength(gv)でピクセルがパターンの中心からどれだけ離れているか

void main() {
    vec4 col = vec4(1.0,  0.0, 0.0, 1.0);
    vec2 uv = (vUv * 2.0 - 1.0) * vec2(uResolution.x / uResolution.y, 1.0);
    float s =2.0;
    vec2 aspect = vec2(2.0, 1.0);
    uv = uv * s * aspect;
    vec2 gv = fract(uv) - 0.5;
 /*
パターンの中心からの距離が0.05のときdropは0(黒)、0.03のときdropは1(白)となり、その間の値では滑らかに0から1への遷移が行われます
length(gv/aspect):x軸とy軸で異なるスケーリングが適用されていると歪んで見えるのでアスペクト比を考慮
*/
    float drop = smoothstep(0.05, 0.03, length(gv/aspect));
   //計算された効果を色に追加
    col += drop;
    if(gv.x>0.4 || gv.y > 0.45) col =vec4(1.0, 1.0, 1.0, 1.0);
    gl_FragColor =  col;
}
雨粒を上下に動かす(上昇はゆっくり、落下は早く)
length(gv/aspect)
gv(パターンの中心にシフトしたUV座標)からvec2(x, y)を引くことで、雨粒の位置を計算
yを時間で動かす
void main() {
   //stは速度を調整するため、0.0にすると停止
    float st = 1.0;
   //uTimeは無限に増加するので、tが0から100の範囲内に収まるようにする
    float t =  mod( uTime * st, 100.0);

//・・・・省略
//雨粒
    float x = 0.0;
    // y座標を時間tに基づいて計算 *0.45で波の高さを調整
    float y = -sin(t+sin(t+sin(t)*0.5))*0.45;
    vec2 dropPos = (gv - vec2(x, y)) / aspect;
    float drop = smoothstep(0.05, 0.03, length(dropPos));
    col += drop;

//省略
}
-sin(t+sin(t+sin(t)*0.5))で上昇はゆっくり、落下は早くなる波を描ける
これはこちらのサイトでシュミレート
https://www.desmos.com/calculator?lang=ja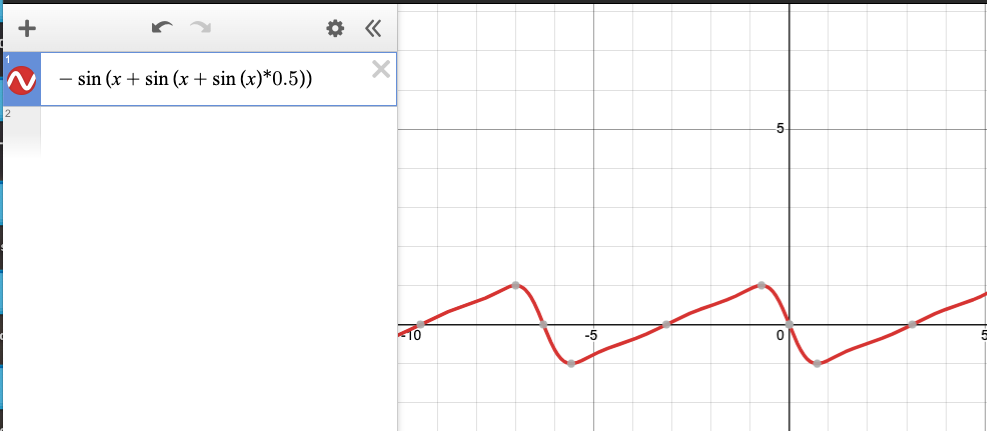
雨粒の形を整える(放物線の形状に沿って調整)![]()
float y = -sin(t+sin(t+sin(t)*0.5))*0.45;
//y位置はx位置からの距離の2乗に比例して変化
y -= gv.x * gv.x;
雨粒が上昇していないように錯覚させる
全体のUV座標をY軸方向に時間とともに移動させてますuv.y += t*0.25;
void main() {
    float st = 1.0;
    float t =  mod( uTime * st, 100.0);

    vec4 col = vec4(1.0,  0.0, 0.0, 1.0);
    vec2 uv = (vUv * 2.0 - 1.0) * vec2(uResolution.x / uResolution.y, 1.0);
    float s =2.0;
    vec2 aspect = vec2(2.0, 1.0);
    uv = uv * s * aspect;
//UV座標をY軸方向に時間とともに移動
    uv.y += t * 0.25;
    vec2 gv = fract(uv) - 0.5;

  //省略
}
雨粒の跡を作成する
//省略
float x = 0.0;
float y = -sin(t+sin(t+sin(t)*0.5))*0.45;
y -= (gv.x-x)*(gv.x-x);

//雨粒
vec2 dropPos = (gv - vec2(x, y)) / aspect;
float drop = smoothstep(0.05, 0.03, length(dropPos));

//雨粒の跡
  //時間tに基づいて移動する位置を引くことで止まっているように見せる
vec2 trailPos = (gv-vec2(x, t*0.25)) / aspect;
  //繰り返しパターンを生成して、元のスケールに戻す
trailPos.y = (fract(trailPos.y * 8.0)-0.5) / 8.0;
float trail = smoothstep(0.03, 0.01, length(trailPos));
//dropPos.yが-0.05以下のときtrailは完全に消えるので粒の大きさを考慮しても雨粒の下には描画されない
trail*=smoothstep(-0.05, 0.05, dropPos.y);

col += drop;
col += trail;
trail*=smoothstep(-0.05, 0.05, dropPos.y);
//0.5からgv.yの範囲でフェードアウト
trail*= smoothstep(0.5, y, gv.y);

col += drop;
col += trail;
X軸はY軸方向に沿って複雑な波のパターンを生成
sin(w3.0)pow(sin(w),6.0)のシュミレート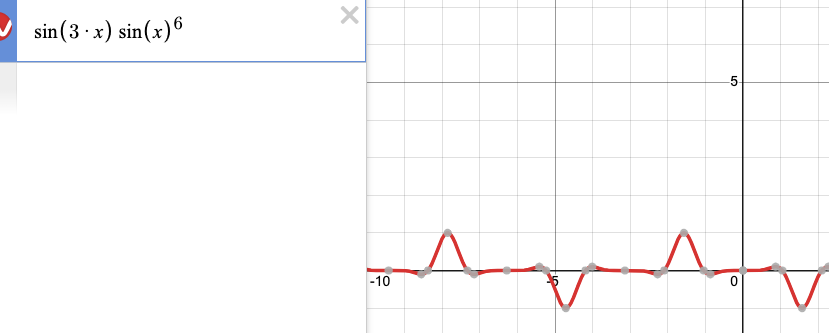
備考:sin(w3.0)pow(sin(w),6.0)は、わたしの低スペックなスマートフォンは処理できないようなので、sin(w)*pow(sin(w),3.0)に変更
 //UV座標を10倍にスケーリングすることで高周波に
 float w = vUv.y * 10.0;
 //波状の変化を生成
 float x = sin(w)*pow(sin(w),3.0);  //数値を調整
 float y = -sin(t+sin(t+sin(t)*0.5))*0.45;
 //gv.x-xでxの位置を計算
 y -= (gv.x-x)*(gv.x-x);
各セルに対するIDを生成して、各セルに異なる時間のオフセットが追加して各セルが異なる動きをするように実装
*floor関数を使用して整数部分を取得することで、各セルに対する整数IDを生成
//与えられた2次元ベクトルから乱数値を生成する関数
float N(vec2 p) {
    p = fract(p*vec2(123.34,345.45));
    p +=dot(p, p+34.345);
    return fract(p.x * p.y);
}


//各セルに対する整数IDを生成
vec2 id = floor(uv);
//idに基づく乱数を生成
float n = N(id);
//6.2831は2*π(360度)の近似値で、時間にnを使用して周期的なオフセットを追加
t += n * 6.2831;
X軸の波のパターンを調整する
//nは0, 1の範囲を-0.4, 0.4の範囲にする
float x = (n - 0.5) * 0.8;
//xの絶対値を引くことでxが中心に近いほど波が大きくなり、遠いほど小さくなる
x += (0.4- abs(x)) * sin(w)*pow(sin(w),3.0);
雨粒の跡にフォグを作成する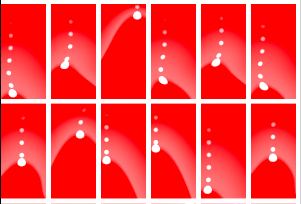
//雨粒の跡trailの強度をfogTrailで調整
    vec2 trailPos = (gv-vec2(x, t*0.25)) / aspect;
    trailPos.y = (fract(trailPos.y*8.0)-0.5)/8.0;
    float trail = smoothstep(0.03, 0.01, length(trailPos));

  //trailの強度はfogTrailで調整
  // trail*=smoothstep(-0.05, 0.05, dropPos.y);
  // trail*= smoothstep(0.5, y, gv.y);
    float fogTrail = smoothstep(-0.05, 0.05, dropPos.y);
    fogTrail*= smoothstep(0.5, y, gv.y);
  //最終的なfogTrailの結果をtrailの強度に適用
    trail*=fogTrail;
  //に0.5倍して全体の色に薄いフォグ効果
    col += fogTrail*0.5;
    col += drop;
    col +=trail;
fogTrailの強度をdropPos.xの値に基づいてさらに調整する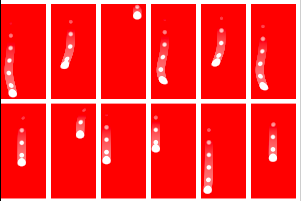
trail*=fogTrail;
//dropPos.xの絶対値に基づく
fogTrail*= smoothstep(0.05, 0.04, abs(dropPos.x));

//省略

//セル削除
// if(gv.x>0.4 || gv.y > 0.45) col =vec4(1.0, 1.0, 1.0, 1.0);
ここまで
ここまでのコード
uniform vec2 uResolution;
uniform float uTime;
varying vec2 vUv;
float N(vec2 p) {
    p = fract(p*vec2(123.34,345.45));
    p +=dot(p, p+34.345);
    return fract(p.x*p.y);
}
void main() {
    float st = 1.0;
    float t =  mod( uTime * st, 100.0);

    vec4 col = vec4(1.0,  0.0, 0.0, 1.0);
    vec2 uv = (vUv * 2.0 - 1.0) * vec2(uResolution.x / uResolution.y, 1.0);
    float s =2.0;
    vec2 aspect = vec2(2.0, 1.0);
    uv = uv * s * aspect;
    uv.y += t*0.25;
    vec2 gv = fract(uv) - 0.5;
    vec2 id = floor(uv);
    float n = N(id);
    t += n * 6.2831;

    float w = vUv.y*10.0;
    float x = (n-0.5)*0.8;
    x +=(0.4-abs(x))* sin(w)*pow(sin(w),3.0);
    float y = -sin(t+sin(t+sin(t)*0.5))*0.45;
    y -= (gv.x-x)*(gv.x-x);

    vec2 dropPos = (gv - vec2(x, y)) / aspect;
    float drop = smoothstep(0.05, 0.03, length(dropPos));

    vec2 trailPos = (gv-vec2(x, t*0.25)) / aspect;
    trailPos.y = (fract(trailPos.y*8.0)-0.5)/8.0;
    float trail = smoothstep(0.03, 0.01, length(trailPos));
    float fogTrail = smoothstep(-0.05, 0.05, dropPos.y);
    fogTrail*= smoothstep(0.5, y, gv.y);
    trail*=fogTrail;
    fogTrail*= smoothstep(0.05, 0.04, abs(dropPos.x));

    col += fogTrail*0.5;
    col += drop;
    col +=trail;

    gl_FragColor =  col;
}
背景をテクスチャで実装
*vec4 colを使用している箇所は不要
正方形の背景画像を準備する
テクスチャを読み込み、シェーダーに渡す
const textureLoader = new THREE.TextureLoader()
const myTexture = textureLoader.load('img/bg.jpg')
// Material
const material = new THREE.ShaderMaterial({
    vertexShader: vertexShader,
    fragmentShader: fragmentShader,
    uniforms:{
        uTime: { value: 0 },
        uResolution: {value: new THREE.Vector2(sizes.width, sizes.height) },
     //シェーダーに渡す
        uTexture: { value: myTexture },
    }
})
フラグメントシェーダー内でsampler2D型の変数を宣言し、テクスチャを参照する
uniform sampler2D uTexture;
varying vec2 vUv;

void main(){
    vec4 textureColor = texture2D(uTexture, vUv);
    gl_FragColor = textureColor;
}
テクスチャをアスペクト比を維持したまま、拡大縮小してボックス全体を埋めるようにする
//テクスチャのスケーリング
float windowAspect = uResolution.x / uResolution.y;
float textureAspect = 1.0; //正方形の場合
vec2 uv0 = vUv;
// 横長の場合、テクスチャのY座標をスケーリング
// 縦長の場合、テクスチャのX座標をスケーリング
if (windowAspect > textureAspect) {
    uv0.y *= textureAspect / windowAspect;
    uv0.y -= (textureAspect / windowAspect - 1.0) * 0.5;
 } else {
    uv0.x *=  windowAspect / textureAspect;
    uv0.x -= ( windowAspect / textureAspect - 1.0) * 0.5;
}
vec4 textureColor = texture2D(uTexture, uv0);
雨粒の位置(vec2のdropPos)を雨粒の強度(floatのdrop)でスケーリング
雨粒の跡の位置(vec2のtrailPos)を雨粒の跡の強度(floatのtrail)でスケーリング
雨粒と雨粒の跡の強度に応じたテクスチャのUV座標のシフト量(オブセット)を計算
元のUV座標にこれらのシフト量(オブセット)を加算することで、雨粒や雨粒の跡の位置でテクスチャが動的に変化
vec2 offs =dropPos * drop + trailPos * trail ;

//省略

vec4 textureColor = texture2D(uTexture, uv0+offs);
gl_FragColor = textureColor;
//distortionの値を変えてテクスチャのシフト量を制御する
float distortion = 8.0;
vec4 textureColor = texture2D(uTexture, uv0+offs * distortion)ガラスの曇りを実装する
texture2D() はシェーダー内でテクスチャをサンプリングするための最も基本的な関数で自動ミップマッピングしますが
textureLod()を使用することで、第三引数でミップマップレベルを選択することができます
*遠距離ほど解像度の低いテクスチャを使用
備考:ミップマッピングは、1つのテクスチャに対して複数の解像度のテクスチャを事前に生成しておく技術で、レンダリング時に距離や視点の大きさに応じて適切な解像度のテクスチャを使用することがでる
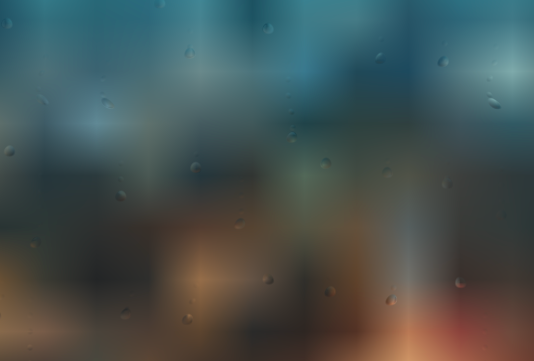
vec4 textureColor = textureLod(uTexture, uv0+offs * distortion, 6.0);fogTrail(強度)を利用して、ミップマップレベルを動的に調整して雨粒の跡は、高解像度にする
 float mipLevel = 6.0 ;
 float blar = mipLevel * (1.0 - fogTrail);

 vec4 textureColor =  textureLod(uTexture, uv0+offs * distortion, blar);
関数として切り出して、多くの雨粒を作成する
引数でUV座標と時間を受け取り、vec3(offs,fogTrail)を返す関数Layerを作成する
//Layer関数
vec3 Layer(vec2 vUv, float t){
    vec2 uv = (vUv * 2.0 - 1.0) * vec2(uResolution.x / uResolution.y, 1.0);
    float s =2.0;
    vec2 aspect = vec2(2.0, 1.0);
    uv = uv * s * aspect;
    uv.y += t*0.25;
    vec2 gv = fract(uv) - 0.5;
    vec2 id = floor(uv);
    float n = N(id);
    t += n * 6.2831;

    float w = vUv.y*10.0;
    float x = (n-0.5)*0.8;
    x +=(0.4-abs(x))* sin(w)*pow(sin(w),3.0);
    float y = -sin(t+sin(t+sin(t)*0.5))*0.45;
    y -= (gv.x-x)*(gv.x-x);

    vec2 dropPos = (gv - vec2(x, y)) / aspect;
    float drop = smoothstep(0.05, 0.03, length(dropPos));

    vec2 trailPos = (gv-vec2(x, t*0.25)) / aspect;
    trailPos.y = (fract(trailPos.y*8.0)-0.5)/8.0;
    float trail = smoothstep(0.03, 0.01, length(trailPos));
    float fogTrail = smoothstep(-0.05, 0.05, dropPos.y);
    fogTrail*= smoothstep(0.5, y, gv.y);
    trail*=fogTrail;
    fogTrail*= smoothstep(0.05, 0.04, abs(dropPos.x));

    vec2 offs =dropPos * drop + trailPos * trail ;
    return vec3(offs,fogTrail);
}

void main() {
    float distortion = 1.0;
    float st = 1.0;
    float t =  mod( uTime * st, 100.0);

/*
Layer関数を実装
UV座標に対して乗算を行うことでスケールを変更
UV座標に対して加算を行うことでUV座標をシフト
*/
    vec3 drops = Layer(vUv,t);
    drops +=Layer(vUv * 1.23 - 9.87, t);
    drops +=Layer(vUv * 1.34 + 6.54, t);
    drops +=Layer(vUv * 2.45 + 3.21, t);

    float mipLevel = 6.0;
    //fogTrailをdrops.zに変更
    float blar = mipLevel * (1.0 - drops.z);

  //テクスチャのスケーリング 省略

   //offsはdrops.xy変更
    vec4 textureColor =  textureLod(uTexture, uv0+drops.xy * distortion, blar);
    gl_FragColor = textureColor;
}
ここまでのコード
uniform vec2 uResolution;
uniform float uTime;
uniform sampler2D uTexture;
varying vec2 vUv;
float N(vec2 p) {
    p = fract(p*vec2(123.34,345.45));
    p +=dot(p, p+34.345);
    return fract(p.x*p.y);
}
vec3 Layer(vec2 vUv, float t){
    vec2 uv = (vUv * 2.0 - 1.0) * vec2(uResolution.x / uResolution.y, 1.0);
    float s =2.0;
    vec2 aspect = vec2(2.0, 1.0);
    uv = uv * s * aspect;
    uv.y += t*0.25;
    vec2 gv = fract(uv) - 0.5;
    vec2 id = floor(uv);
    float n = N(id);
    t += n * 6.2831;

    float w = vUv.y*10.0;
    float x = (n-0.5)*0.8;
    x +=(0.4-abs(x))* sin(w)*pow(sin(w),3.0);
    float y = -sin(t+sin(t+sin(t)*0.5))*0.45;
    y -= (gv.x-x)*(gv.x-x);

    vec2 dropPos = (gv - vec2(x, y)) / aspect;
    float drop = smoothstep(0.05, 0.03, length(dropPos));

    vec2 trailPos = (gv-vec2(x, t*0.25)) / aspect;
    trailPos.y = (fract(trailPos.y*8.0)-0.5)/8.0;
    float trail = smoothstep(0.03, 0.01, length(trailPos));
    float fogTrail = smoothstep(-0.05, 0.05, dropPos.y);
    fogTrail*= smoothstep(0.5, y, gv.y);
    trail*=fogTrail;
    fogTrail*= smoothstep(0.05, 0.04, abs(dropPos.x));

    vec2 offs =dropPos * drop + trailPos * trail ;
    return vec3(offs,fogTrail);
}

void main() {
    float distortion = 1.0;
    float st = 1.0;
    float t =  mod( uTime * st, 100.0);

    vec3 drops = Layer(vUv,t);
    drops +=Layer(vUv * 1.23 - 9.87, t);
    drops +=Layer(vUv * 1.34 + 6.54, t);
    drops +=Layer(vUv * 2.45 + 3.21, t);

    float mipLevel = 6.0;
    float blar = mipLevel * (1.0 - drops.z);

    float windowAspect = uResolution.x / uResolution.y;
    float textureAspect = 1.0;
    vec2 uv0 = vUv;
    if (windowAspect > textureAspect) {
        uv0.y *= textureAspect / windowAspect;
        uv0.y -= (textureAspect / windowAspect - 1.0) * 0.5;
    } else {
        uv0.x *=  windowAspect / textureAspect;
        uv0.x -= ( windowAspect / textureAspect - 1.0) * 0.5;
    }

    vec4 textureColor =  textureLod(uTexture, uv0+drops.xy * distortion, blar);
    gl_FragColor = textureColor;
}