ピクセルデータの取得と操作
ピクセルデータの取得getImageData(left, top, width, height)
*rgba(赤・緑・青・透明度)の4個ずつのデータを取得
<canvas width="300" height="200"></canvas>
<script>
const canvas = document.querySelector('canvas')
const c = canvas.getContext("2d")
const img = new Image()
img.src = "..."
//loadイベント完了後、canvas画像を描画
img.addEventListener('load', () => {
   c.drawImage(img1, 0, 0, canvas.width, canvas.height)
   const scanImg = c.getImageData(0, 0, canvas.width, canvas.height)
   const data = scanImg.data
   console.log(data)
})
</script>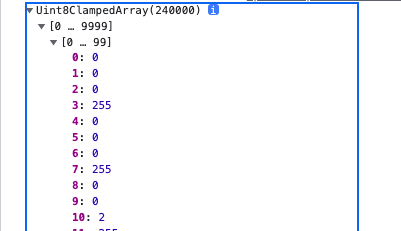
多次元配列
列の数:「canvas.width * 4」
行の数:「canvas.height 」
putImageData()でコンテキストにピクセルデータを描く
ピクセルデータの配列の数だけループしてデータを置き換える
*グレースケール化は(R + G + B)/ 3
const canvas = document.querySelector('canvas')
const c = canvas.getContext("2d")
const img = new Image()
img.src = "..."
img.addEventListener('load', () => {
   c.drawImage(img, 0, 0, canvas.width, canvas.height)
   const scanImg = c.getImageData(0, 0, canvas.width, canvas.height)
   const data = scanImg.data
//データをグレースケールに置き換える
   for(let i = 0; i < data.length; i+=4){
        let avg = (data[i] +data[i + 1] + data[i + 2]) / 3
        data[i]= avg
        data[i + 1] = avg
        data[i + 2] = avg
   }
   c.putImageData(scanImg, 0, 0)
})
//セピア化
for(let i = 0; i < data2.length; i+=4){
let red = data[i], green = data[i + 1], blue = data[i + 2]
data[i] = Math.min(Math.round(0.393 * red + 0.769 * green + 0.189 * blue), 255)
data[i + 1] = Math.min(Math.round(0.349 * red + 0.686 * green + 0.168 * blue), 255)
data[i + 2] = Math.min(Math.round(0.272 * red + 0.534 * green + 0.131 * blue), 255)
}粒子のオブジェクトを作り画像の上でアニメーション
*画像は再描画を続ける
const img = new Image()
img.src = "...";
img.addEventListener('load', () => {
 const canvas = document.querySelector('canvas')
 const c = canvas.getContext("2d")
 c.drawImage(img, 0, 0, canvas.width, canvas.height)
 //粒子クラス
 class Partcle{
     constructor(){
      this.x = Math.random()*canvas.width
      this.y = Math.random()*canvas.height
      this.velocity = Math.random()* 2
      this.radius = Math.random()*1.5+1
    }
   draw(){
     c.beginPath()
     c.arc(this.x, this.y, this.radius, 0, Math.PI * 2)
     c.fillStyle = 'white'
     c.fill()
    }
  update(){
    this.draw()
    this.y+= this.velocity
     if(this.y > canvas.height){
      this.y = 0
      this.x = Math.random()*canvas.width
    }
   }
 }
 //初期化
 let pArray=[]
 const pCount = 500
 function init(){
   pArray =[];
   for(let i = 0; i < pCount; i++){
     pArray.push(new Partcle)
    }
  }
 //アニメーション
 function animation(){
   requestAnimationFrame(animation);
   c.drawImage(img, 0, 0, canvas.width, canvas.height)
   c.globalAlpha = 0.1
   c.fillStyle ='rgb(0,0,0)'
   c.fillRect(0, 0, canvas.width, canvas.height)
   pArray.forEach( p =>{
       p.update()
    })
  }
 init()
 animation()
})粒子の移動速度をピクセルデータで調整
暗いところは早く、明るいところは遅くする
*Grayscale = 0.299R + 0.587G + 0.114B(赤、緑、青を加重をしたグレースケール値)
*余談:不透明度は0.2125R+0.7154G+0.0721B
画像情報から彩度情報を配列(多次元配列[y][x][0])に格納し速度に利用する
*画像は再描画しない(globalAlpha = 0.02を設定する)
function calBrightness(red, green, blue){
 return Math.sqrt(
 (red*red)*0.299 + (green*green)*0.587 + (blue*blue)*0.114
  )/100
}
const img = new Image()
img.src = "..."
function calBrightness(red, green, blue){
return Math.sqrt(
(red*red)*0.299 + (green*green)*0.587 + (blue*blue)*0.114
)/100
}
img.addEventListener('load', () => {
const canvas = document.querySelector(canvas')
const c = canvas.getContext("2d")
c.drawImage(img, 0, 0, canvas.width, canvas.height)
// 画像の情報を元にしたグレースケール数を格納する多次元配列(bInfo[y][x][0])を作る
const pixels = c.getImageData(0, 0, canvas.width, canvas.height)
let bInfo=[]
for(let y = 0; y < canvas.height; y++){
let row =[]
for(let x = 0; x < canvas.width; x++){
const red = pixels.data[( y*4*pixels.width)+(x*4)]
const green = pixels.data[(y*4*pixels.width)+(x*4+1)]
const blue = pixels.data[(y*4*pixels.width)+(x*4+2)]
const brightness = calBrightness(red, green, blue)
const cell =[ brightness ]
row.push(cell)
}
bInfo.push(row)
}
//クラス
class Partcle{
constructor(){
this.x = Math.random() * canvas.width
this.y = 0
this.speed = 0
this.velocity = Math.random() * 0.3
this.radius = Math.random() * 1.5 + 1
}
draw(){
c.beginPath()
c.fillStyle = 'white'
c.arc(this.x, this.y, this.radius, 0, Math.PI * 2)
c.fill()
}
update(){
this.draw();
//多次元配列(bInfo[y][x][0])をスペードに反映させる
this.speed = bInfo[Math.floor(this.y)][ Math.floor(this.x)][0]
this.y += (2.5 - this.speed) + this.velocity;
if(this.y >= canvas.height){
this.y = 0
this.x = Math.random() * canvas.width
}
}
}
//初期化
let pArray=[]
const pCount = 5000
function init(){
pArray =[];
for(let i = 0; i < pCount; i++){
pArray.push(new Partcle)
}
}
function animation(){
requestAnimationFrame(animation)
c.globalAlpha = 0.02
c.fillStyle ='rgb(0,0,0)'
c.fillRect(0, 0, canvas.width, canvas.height)
pArray.forEach( p =>{
p.update()
})
}
init()
animation()
})上のコードの22・23行目と39行目を変更する
画像情報からrgb値を配列(多次元配列[y][x][1])に格納
*粒子の色を白からrgbで指定した色にする
//追加
const cellColor = `rgb(${red},${green},${blue} )`
//変更
const cell =[ brightness, cellColor];
//変更
c.fillStyle = bInfo[Math.floor(this.y)][ Math.floor(this.x)][1];横方向への動きを追加(47行目から51行目を変更)
*粒子は斜め下に移動
this.y += (2.5 - this.speed) + this.velocity
this.x += (2.5 - this.speed) + this.velocity
if(this.y >= canvas.height){
  this.y = 0
  this.x = Math.random() * canvas.width
 }
if(this.x >= canvas.width){
  this.x = 0
  this.y = Math.random() * canvas.height
}粒子の動きにMath.cos(radians)とMath.sin(radians)を利用する
//クラス
 class Partcle{
     constructor(){
     //追加
      this.angle = 0
    }
   //省略
   update(){
  //省略
    this.angle += 0.3
    //条件が必須
    if(bInfo[Math.floor(this.y)]&&bInfo[Math.floor(this.y)][ Math.floor(this.x)]){
     this.speed = bInfo[Math.floor(this.y)][ Math.floor(this.x)][0]
    }
    //y方向の動きにMath.sin(angle)を追加
   this.y += (2.5 - this.speed) + this.velocity + Math.sin(this.angle)
    //y方向の動きにMath.cos(angle)を追加
    this.x += (2.5 - this.speed) + this.velocity + Math.cos(this.angle)
  //省略
   }
}CanvasGradientオブジェクト
粒子の色をグラデーションにする
*CanvasGradientオブジェクトを作成してfillStyleまたはstrokeStyleプロパティに代入できます
(備考)古いiPhoneではグラデーションが遅くなりアニメーションできなかったw
//グラデーションオブジェクトを作成
const lineargradient = c.createLinearGradient(0, 0, canvas.width, canvas.height)
lineargradient.addColorStop(0.2, 'white')
lineargradient.addColorStop(0.5, 'red')
lineargradient.addColorStop(0.8, 'yellow')

//33行目を変更する
c.fillStyle = lineargradientcreateLinearGradient(x1, y1, x2, y2): 線形グラデーション
「x1, y1」から「x2, y2」の位置に生成createRadialGradient(x1, y1, r1, x2, y2, r2):放射グラデーション
引数は 2 つの円
一つは 「x1, y1」が中心で半径が「r1 」もう一つは 「x2, y2」が中心で半径が「r2」createConicGradient(angle, x, y):扇形グラデーション
angleはラジアンの開始角、「x, y」が位置addColorStop()メソッドを使って色を割り当てます
合成演算(globalCompositeOperation)
globalCompositeOperation:新たな図形を描くときに適用する合成演算の種類c.globalCompositeOperation = type;
*時間の経過で切り替える(setInterval()を使った例)
*試し用の粒子の色はオレンジ
let switcher = 1
let counter = 0
setInterval(()=>{
 counter ++;
 if(counter % 6 === 0){
   switcher *= -1
 }
},1000)

update(){
 if(switcher === 1){
  c.globalCompositeOperation ='multiply'
 } else{
  c.globalCompositeOperation ='screen'
 }
 //省略
} 変化を試す
- source-over
既定の設定 - source-in
新たな図形はキャンバスの内容が重なり合う部分のみ描かれる
それ以外の部分は透明になります - source-out
重なり合わない部分のみが描かれる - source-atop
重なり合う部分のみが描かれます - destination-over
背後に描かれます - destination-in
重なり合う部分だけが残りそれ以外の部分は透明 - destination-out
重なり合わない部分だけが残る - destination-atop
重なり合う部分だけが残りその背後に描かれる - lighter
重なる部分はカラー値が加算 - copy
新たな図形だけが描かれる - xor
重なり合う部分は透明でそれ以外は通常通り描かれる - multiply
ピクセルとカラー値が乗算され各ピクセルのカラーは暗くなる - screen
ピクセルを反転し乗算して反転されピクセルのカラーは明るくなる - overlay
暗いときは暗く、明るければ明るくなる - darken
暗い方のピクセルを残す - lighten
明るい方のピクセルを残す - color-dodge
下層のレイヤーを上層のレイヤーの反転値で除算 - color-burn
下層のレイヤーを上層のレイヤーで除算し反転させる - hard-light
multiplyとscreenをoverlayのように組み合わせ上層と下層が逆 - soft-light
hard-lightを柔らかくします(純粋な黒と白は真っ黒や真っ白にならない) - difference
上層のレイヤーから下層のレイヤーを引くかその逆を行い正の値を取得 - exclusion
difference と似ていますがコントラストを弱める - hue
下層の輝度と彩度を保ち上層の色相に合わせる - saturation
下層の輝度と色相を保ち上層の彩度に合わせる - color
下層の輝度を保ち上等の色相と彩度に合わせる - luminosity
下層の色相と彩度を保ち上層の輝度に合わせる
テキストのアニメーション
特定の範囲を移動させてその範囲内にある粒子を動かす
<canvas width="300" height="200" style="background:black;"></canvas>
<script>
const canvas = document.querySelector('canvas')
const c = canvas.getContext("2d");
//距離を計算する関数(粒子の中心と特定の範囲の中心の距離を計算)
function distance(x1, y1, x2, y2) {
  const xDist = x2 - x1
  const yDist = y2 - y1
  return Math.sqrt(Math.pow(xDist, 2) + Math.pow(yDist, 2))
}
class Partcle{
  constructor(x,y){
  this.radius = 1
  this.x = x
  this.y = y
  this.baseX = this.x
  this.baseY = this.y
  this.dx = 0 //特定の範囲x方向の中心
  this.dy = canvas.height/2 + Math.random()*10;//特定の範囲y方向の中心
  this.density = (Math.random()*30)+1 //調整用
  }
 draw(){
  c.fillStyle = 'white'
  c.beginPath()
  c.arc(this.x, this.y, this.radius, 0, Math.PI * 2)
  c.fill()
 }
 update(){
  this.draw()
  this.dx += 1;//スピード
  if(this.dx > canvas.width){
      this.dx = 0
      this.dy = canvas.height/2 + Math.random()*10
    }
 //範囲(最大の距離)
  let maxDis = 50;
 //粒子の中心と特定の範囲の中心の距離
  let dis = distance(this.x, this.y, this.dx, this.dy)
 //距離が近いほど大きくなり最大の距離の場合は0
  let force = (maxDis-dis)/maxDis
  let forceX = (this.dx-this.x)/dis // X軸の距離/距離
  let forceY = (this.dy-this.y)/dis // Y軸の距離/距離
  let dirX = forceX * force * this.density //x軸方向への移動
  let dirY = forceY * force * this.density  //y軸方向への移動
  if( dis < maxDis){
    this.x -= dirX; //範囲内の粒子は-x軸方向へ移動
    this.y -= dirY; //範囲内の粒子は-y軸方向へ移動
    }
  else{
  //x軸方向やy軸方向へ移動した粒子の場合
    if(this.x !== this.baseX){this.x-=(this.x-this.baseX)/10}
    if(this.y !== this.baseY){this.y-=(this.y-this.baseY)/10}
   }
 }
}
let pArray=[];
const pCount = 1000;
function init(){
 pArray=[];
 for(let i = 0; i < pCount; i++){
   let x =  Math.random()*canvas.width;
   let y =  Math.random()*canvas.height;
   pArray.push(new Partcle(x, y))
 }
}
function animation(){
  requestAnimationFrame(animation);
  c.clearRect(0, 0, canvas.width, canvas.height);
  pArray.forEach( p =>{
    p.update();
  })
 }
init()
animation()
</script>テキストのピクセル情報を取得
テキストのピクセル情報に粒子を配置してアニメーションする
<canvas width="300" height="200" style="background:black;"></canvas>
<script>
const canvas = document.querySelector('canvas')
const c = canvas.getContext("2d");
function distance(x1, y1, x2, y2) {
  const xDist = x2 - x1
  const yDist = y2 - y1
  return Math.sqrt(Math.pow(xDist, 2) + Math.pow(yDist, 2))
}
//テキスト
c.fillStyle='white'
c.font = '30px serif';
c.fillText('A', 0, 30);
//テキストのピクセル情報を取得
const textData = c.getImageData(0, 0, 50, 50)
class Partcle{
  constructor(x,y){
  this.x = x;
  this.y = y;
  this.dx = 0;
  this.dy =  canvas.height/2 + Math.random()*10;
  this.radius = 1;
  this.baseX = this.x;
  this.baseY = this.y;
  this.density = (Math.random()*30)+1;
  }
 draw(){
 //省略
 }
 update(){
 //範囲(最大の距離)
  let maxDis = 60;
 //省略
 }
}
let pArray=[]
const pCount = 1000
function init(){
 pArray =[];
//テキストのピクセル情報に粒子を配置
 for(let y = 0; y < textData.height; y++){
     for(let x = 0; x < textData.width; x++){
       //透明度のチェック
       if(textData.data[(y*4*textData.width)+(x*4)+3]>128){
        let size = 6 //拡大
        let px = x;
        let py = y;
        pArray.push(new Partcle(px*size+80, py*size)); //80はx軸の位置調整
       }
     }
   }
}
function animation(){
 //省略
 }
init()
animation()
</script>近い距離にある粒子を線で繋ぐ
//線で繋ぐための関数
function createLine(){
  for(let a=0; a < pArray.length; a++){
     for(let b=0; b < pArray.length; b++){
      //粒子間の距離 (*定義済みのdistance関数)
       let pDis = distance(pArray[a].x, pArray[a].y, pArray[b].x, pArray[b].y);
       if(pDis < 12){
        c.strokeStyle='rgba(255,255,255,0.5)';
        c.lineWidth=2;
        c.beginPath();
        c.moveTo(pArray[a].x, pArray[a].y);
        c.lineTo(pArray[b].x, pArray[b].y);
        c.stroke();
       }
     }
   }
}

function animation(){
  requestAnimationFrame(animation);
  c.clearRect(0, 0, canvas.width, canvas.height);
  pArray.forEach( p =>{
    p.update();
  })
//ここに追加
createLine()
}テキストを中央に配置したり、レスポンシブに対応するためのセッティングをする
コードを見る
<!DOCTYPE html>
<html lang="ja">
<head>
    <meta charset="UTF-8">
    <meta http-equiv="X-UA-Compatible" content="IE=edge">
    <meta name="viewport" content="width=device-width, initial-scale=1.0">
    <title>テキストアニメーションデモ</title>
    <style>
    *{
        margin:0;
        padding:0;
        box-sizing:boder-box;
    }
    canvas{
        position:absolute;
        background:black;
        top:0;
        left:0;
    }
    </style>
</head>
<body>
<canvas id="canvas"></canvas>
<script>
//最大幅に収まる長さのテキストを配列に格納する関数
function wrapText(c, text, maxWidth) {
    const textArray = []
    const wordsArray = Array.from(text); //1文字ずつ格納配列にする
    const results = wordsArray.reduce((accu, word) => {
        // measureText()テキストの描画幅がmaxWidthより大きいとき
     if (c.measureText(accu).width > maxWidth && accu.includes("")) {
          //空白があれば空白で区切る
        let words = accu.split(" ");
        accu = words[words.length - 1]; //最後の空白以降の文字
        words.pop();
        if (words.join().replace(/,/g, " ") !== "") {
            textArray.push(words.join().replace(/,/g, " "));
            }
        }
     if (c.measureText(accu).width > maxWidth) {
         textArray.push(accu); //textArrayに格納して
        accu = ""; //空にする
       }
     return accu + word;
    }, '');
    textArray.push(results);
    return textArray;
}
//テキストの配列を描画する関数
function drawText(c, array, textX, textY, lineHeight) {
     array.forEach((el, index) => {
       c.fillText(
         el,
         textX,
         textY -
           (lineHeight * array.length) / 2 +
           index * lineHeight +
           lineHeight / 2
       );
     });
}
//粒子間の距離を計算する関数
function distance(x1, y1, x2, y2) {
  const xDist = x2 - x1;
  const yDist = y2 - y1;
  return Math.sqrt(Math.pow(xDist, 2) + Math.pow(yDist, 2));
}
//粒子間に線を引く時の関数
function createLine(c, pArray) {
    if (pArray){
      for (let a = 0; a < pArray.length; a++) {
        for (let b = 0; b < pArray.length; b++) {
          //粒子間の距離 (*定義済みのdistance関数)
          let pDis = distance(
            pArray[a].x,
            pArray[a].y,
            pArray[b].x,
            pArray[b].y
          );
          if (pDis < 20) {
            c.strokeStyle = "rgba(255,255,255,0.1)";
            c.lineWidth = 1;
            c.beginPath();
            c.moveTo(pArray[a].x, pArray[a].y);
            c.lineTo(pArray[b].x, pArray[b].y);
            c.stroke();
          }
        }
      }
    }
  }
//テキストなどセッディングクラス
class Setting {
  constructor(c, width, height) {
    this.c = c;
    this.width = width;
    this.height = height;
    this.textX = this.width / 2;
    this.textY = this.height / 2;
    this.fontSize = 100;
    this.lineHeight = this.fontSize * 1.2;
    this.maxWidth = this.width * 0.7;
    this.textArray = []; //文字列の配列
    this.pArray = []; //Partcleのインスタンスを格納
    this.gap = 5;
  }
  wrapText(text) {
    this.c.font = `${this.fontSize}px serif`;
    this.c.fillStyle = "white";
    this.c.textAlign = "center";
    this.c.textBaseline = "middle";
    //テキストを配列に格納
    this.textArray = wrapText(this.c, text, this.maxWidth);
    //テキストの描画
    drawText(this.c, this.textArray, this.textX, this.textY, this.lineHeight);
  }
  init() {
    this.pArray = [];
    const textData = this.c.getImageData(0, 0, this.width, this.height);
    for (let y = 0; y < textData.height; y += this.gap) {
      for (let x = 0; x < textData.width; x += this.gap) {
        //透明度のチェック
        if (textData.data[y * 4 * textData.width + x * 4 + 3] > 128) {
          let px = x;
          let py = y;
          this.pArray.push(
            new Partcle(
              this, //Settingクラス
              px,
              py,
            )
          );
        }
      }
    }
  }
  render() {
  this.c.clearRect(0, 0, this.width, this.height);
  this.pArray.forEach((p) => {
      p.update();
  });
  createLine(this.c, this.pArray);
  }
}
//粒子作成クラス
class Partcle {
  constructor(setting, x, y) {
    this.setting = setting;
    this.radius = 1;
    this.textArea = 80; //範囲(最大の距離)
    this.x = x;
    this.y = y;
    this.baseX = this.x;
    this.baseY = this.y;
    this.dx = 0; //特定の範囲x方向の中心
    this.dy = this.setting.height / 2 + Math.random() * 10; //特定の範囲y方向の中心
    this.density = Math.random() * 30 + 1; //調整用
  }
  draw() {
    this.setting.c.fillStyle = "white";
    this.setting.c.beginPath();
    this.setting.c.arc(this.x, this.y, this.radius, 0, Math.PI * 2);
    this.setting.c.fill();
  }
  update() {
    this.draw();
    this.dx += 3; //スピード
    if (this.dx > this.setting.width) {
      this.dx = -200;
      this.dy = this.setting.height / 2 + Math.random() * 10;
    }
    //粒子の中心と特定の範囲の中心の距離
    let dis = distance(this.x, this.y, this.dx, this.dy);
    //距離が近いほど大きくなり最大の距離の場合は0
    let force = (this.textArea - dis) / this.textArea;
    let forceX = (this.dx - this.x) / dis; // X軸の距離/距離
    let forceY = (this.dy - this.y) / dis; // Y軸の距離/距離
    let dirX = forceX * force * this.density; //x軸方向への移動
    let dirY = forceY * force * this.density; //y軸方向への移動
    if (dis < this.textArea) {
      this.x -= dirX; //範囲内の粒子は-x軸方向へ移動
      this.y -= dirY; //範囲内の粒子は-y軸方向へ移動
    } else {
      //x軸方向やy軸方向へ移動した粒子の場合
      if (this.x !== this.baseX) {
        this.x -= (this.x - this.baseX) / 10;
      }
      if (this.y !== this.baseY) {
        this.y -= (this.y - this.baseY) / 10;
      }
    }
  }
}
const canvas = document.getElementById("canvas");
//etImageData() を頻繁に呼び出すときにメモリを節約できる
const c = canvas.getContext("2d", { willReadFrequently :true});
canvas.width = window.innerWidth;
canvas.height = window.innerHeight;
let setting = new Setting(c, canvas.width, canvas.height);
setting.wrapText("CONGRATS");
setting.init();

function animation() {
  requestAnimationFrame(animation);
    setting.render();
    createLine();
}

window.addEventListener("load", animation);
//リサイズ
window.addEventListener("resize", () => {
  canvas.width = window.innerWidth;
  canvas.height = window.innerHeight;
  setting = new Setting(c, canvas.width, canvas.height);
  setting.wrapText("CONGRATS");
  setting.init();
});
</script>
</body>
</html>
散らばった粒子が集まるような動きの場合
// 粒子作成クラス
class Partcle {
  constructor(setting, x, y) {
    this.setting = setting;
    this.size = this.setting.gap -2;
    this.x = Math.random() * this.setting.width;
    this.y = Math.random() * this.setting.height;
    this.originX = x;
    this.originY = y;
    this.dx = 0;
    this.dy = 0;
    this.ease = Math.random() * 0.1 + 0.005;
  }
  draw() {
    this.setting.c.fillStyle = "white";
    this.setting.c.fillRect(this.x, this.y, this.size, this.size)
    this.setting.c.fill();
  }
  update() {
    this.draw();
      this.x += (this.originX - this.x) * this.ease;
      this.y += (this.originY - this.y) * this.ease;
  }
}