別のブロックに変換
「P(’core/paragraph’)ブロック」から「その1で作成したtestブロック(’create-block/test’)」へ変換したり、「testブロック(’create-block/test’)」から「P(’core/paragraph’)ブロック」へ変換したりができるようにします
その1
「transforms」は「fromとto(どちらの方向の変換をサポートするか)」の2つのキーを持ちます
「testブロック(’create-block/test’)のindex.js」に「transforms」を追加・編集します
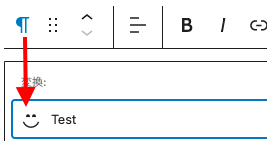
試しに、エディタで「Pブロック」でテキスト入力して整列(align)を選択し、コンソールで「attributes」を確認してみます
registerBlockType('create-block/test', {
	transforms: {
		from: [
			{
//変換タイプ
				type: "block",
//~から変換
				blocks: ["core/paragraph"],
//入力された値を受け取るコールバック
				transform: (attributes) => {
					console.log(attributes)
				}
			}
		],
		to: [

		]
	},
//editとsaveは省略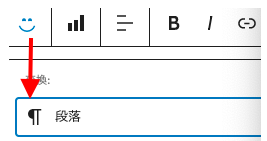
} );「testブロック」の「block.jsonファイル」ですが、留意点は「Pブロック」とはキーの名前が異なることです
ブロックを変換するために「createBlock」をインポートします
import { registerBlockType, createBlock } from '@wordpress/blocks';
//省略
registerBlockType('create-block/test', {
	transforms: {
//「P('core/paragraph')ブロック」から「testブロック('create-block/test')」へ変換処理
		from: [
			{
				type: "block",
				//"core/paragraph"から
				blocks: ["core/paragraph"],
				//処理されるブロックの属性を受け取るコールバック
				transform: ({ content, align }) => {
					return createBlock('create-block/test', {
						//testブロックのcontentにPブロックのcontent
						content: content,
						//testブロックのalignmentにPブロックのalign
						alignment: align
					});
				}
			}
		],
//「testブロック('create-block/test')」から「P('core/paragraph')ブロック」へ変換処理
		to: [
			{
			type: "block",
			//"core/paragraph"へ
			blocks: ["core/paragraph"],
			//isMatchでfalseを返すと変換を適用しない
			//contentがあるときだけ変換を選択できる
			isMatch: ({ content }) => {
 				if (content) return true;
					return false;
 				},
			transform: ({ content, alignment }) => {
				return createBlock('core/paragraph', {
					content: content,
					align: alignment
					});
				}
			}
		]
	},
	edit({ attributes, setAttributes }) {
	//省略
} );
*isMatchの値は関数(第1引数にブロックの属性・第2引数にブロックオブジェクト)で「trueかfalse」を返すコールバックです
参考ブラウザのコンソールでwp.blocks.getBlockTypes()と入力するとブロック名の完全なリストが表示されます
コアブロックの「attributes」や「ブロック名」の確認に便利です
InnerBlocks
他のブロックをネストするブロックを作ります
写真とコンテンツ(段落かリスト)を横に並べる、超シンプルな「メディアタイプのグループ」です
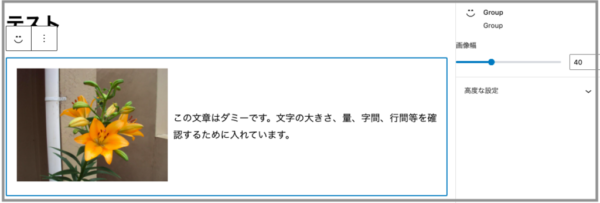
ブロック名は「create-block/group」にしています
block.jsonファイルの「attributes」に「mediaWidth」を追加
{
    "$schema": "https://json.schemastore.org/block.json",
    "apiVersion": 2,
    "name": "create-block/group",
    "version": "0.1.0",
    "title": "Group",
    "category": "design",
    "icon": "smiley",
    "description": "Group",
    "attributes": {
        "mediaWidth": {
            "type": "number",
            "default": 50
        }
    },
    "supports": {
        "html": true
    },
    "editorScript": "file:./build/index.js",
    "editorStyle": "file:./build/index.css",
    "style": "file:./build/style-index.css"
}
index.jsファイルの編集
「InnerBlocks」をつかい「core/image・core/paragraph・core/list」を含むことができるブロックを作ります
「InnerBlocksコンポーネントの属性」はコードに説明を記載
*seveでは<InnerBlocks.Content />を返します
「InspectorControlsとRangeControl」で画像の幅を変更します
import { registerBlockType } from '@wordpress/blocks';
import { useBlockProps, InnerBlocks, InspectorControls } from '@wordpress/block-editor';
import { RangeControl } from "@wordpress/components";
import './style.scss';
import './editor.scss';

registerBlockType('create-block/group', {
    edit({ attributes, setAttributes }) {
    const { mediaWidth } = attributes;
    const blockProps = useBlockProps({
        className:`img-size-${mediaWidth}`
    } );
//許可するブロックの定義
    const ALLOWED_BLOCKS = ['core/image', 'core/paragraph', 'core/list'];
//デフォルトで含まれるブロックの集合を定義
    const MY_TEMPLATE = [
        ['core/image', {}],
        ['core/paragraph', { placeholder: 'Summary' }],
    ];
return (
    <div { ...blockProps }>
        <InspectorControls>
            <panelBody>
                <RangeControl
                    label={"画像幅"}
                    value={ mediaWidth }
                    onChange={( mediaWidth ) => setAttributes( { mediaWidth } )}
                    min={10}
                    max={100}
                />
            </panelBody>
        </InspectorControls>
        <InnerBlocks
        // 許可するブロックを定義
            allowedBlocks={ALLOWED_BLOCKS}
        // 横に並びのレイアウトに設定
            orientation="horizontal"
        //デフォルトで含まれるブロックの設定(最初に表示される)
            template={MY_TEMPLATE}
        // all:テンプレートをロック・insert:追加は禁止でブロックの並べ替えはできる
        //	templateLock="all"
        //追加ボタンを表示しない
            renderAppender={ false }
        />
    </div>
    );
    },

save({ attributes }) {
    const { mediaWidth } = attributes;
    const blockProps = useBlockProps.save({
        className:`img-size-${mediaWidth}`
    });
return (
        <div { ...blockProps }>
            <InnerBlocks.Content />
        </div>
    );
    }

} );
style.scssファイルの編集例w
とりあえず「wp-block-create-block-groupクラス」と「img-size-[画像の幅]クラス」が付くので、flexBoxをつかい「子要素figure」の「flex-basisで画像の幅を調整」しています
.wp-block-create-block-group {
    border: solid 1px #ccc;
    width: 100%;
    display: flex;
    align-items: center;
    padding: 10px 10px 10px 0;
    margin: 20px 0;
}
@for $i from 10 through 100 {
.wp-block-create-block-group.img-size-#{$i} {
    & > figure {
    flex-basis: calc(#{$i}% - 20px);
    flex-shrink: 0;
    margin: 0 !important;
    padding: 0 0 0 10px !important;
        }
    & > p{
    margin: 0 auto !important;
    padding: 0 0 0 10px !important;
    }
    & > ul{
    margin: 0 auto !important;
    padding: 0 0 0 10px !important;
    }
    }
}
editor.scssファイルの編集例
editor.scssはカオス状態w
figureなどが子孫要素になるため、editor.scssを編集しないと、エディタ側の表示に反映されません💦
.wp-block-create-block-group {
 border: solid 1px #ccc;
 margin: 20px 0;
 padding: 10px 10px 10px 0;
 //先祖にdisplay: flexが効いているので
 display: block;
}
@for $i from 10 through 100 {
.wp-block-create-block-group.img-size-#{$i} {
  & > .block-editor-inner-blocks > .block-editor-block-list__layout{
    width: 100%;
    display: flex;
    align-items: center;
    & > figure {
 //先祖にdisplay: gridが効いているので
    display: block;
    margin: 0 !important;
    flex-basis: calc(#{$i}% - 20px);
    flex-shrink: 0;
    padding: 0 0 0 10px !important;
    }
    & > p{
    margin: 0 auto !important;
    padding: 0 0 0 10px !important;
    }
    & > ul{
    margin: 0 auto !important;
    padding: 0 0 0 10px !important;
    }
    }
 }
}
今回は「コアブロック(既存のブロック)」をネストしましたが
親のブロック専用の子カスタムブロックを作ったときは
子ブロックの「block.jsonのparentキー」に親ブロックを登録します(こうすることで、子ブロックは親ブロック内以外でブロック選択肢に表示されません)
例 "parent": [ "create-block/group" ]
親ブロックから子ブロックに値をわたす
親ブロックの「block.json」
*コンテキストキーには名前空間を含めることが推奨
"providesContext": {"コンテキストキー": "渡したいattriattributesのキー"},
子ブロック側
*(注意)「 save 」では利用できません
usesContext: ['コンテキストキー'],
//利用するときは
{props.context['コンテキストキー']}
配列を取り出す(ソーシャルアイコン)
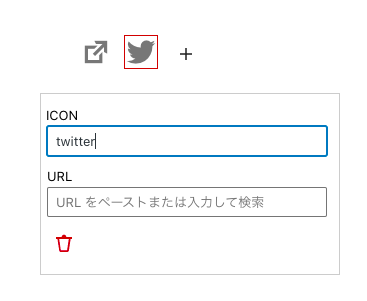
アイコンはDashiconの名前を直接入力、色も同じでお粗末なものですが💦
配列で管理するためややこしいです
<div class="wp-block-create-block-social"><ul><li data-icon="ここにアイコン名"><a href="ここにURL"><span class="dashicon dashicons dashicons-external"></span></a></li>省略・・・・・</ul></div>
ブロック名は「create-block/social」にしています
コメント(ブロックデリミタ)内ではなく、上のようにエディタに読み込まれる必要があります
(コードエディタで表示したときのことです)
attributesがもつ値のタイプをarray(配列)にします
queryソース・queryフィールドを利用します
詳細リンク
    {
    "$schema": "https://schemas.wp.org/trunk/block.json",
    "apiVersion": 2,
    "name": "create-block/social",
    "version": "0.1.0",
    "title": "Social",
    "category": "design",
    "icon": "smiley",
    "description": "Social",
    "attributes": {
        "social": {
            "type": "array",
            "default": [],
            "source": "query",
            "selector": "li",
            "query": {
                "icon": {
                    "type": "string",
                    "source": "attribute",
                    "attribute": "data-icon"
                    },
                "link": {
                    "type": "string",
                    "source": "attribute",
                    "selector": "a",
                    "attribute": "href"
                }
            }
        }
    },
    "supports": {
        "html": true
    },
    "editorScript": "file:./build/index.js",
    "editorStyle": "file:./build/index.css",
    "style": "file:./build/style-index.css"
}
1 :State管理(どのアイコンが選択されているか)のために「useState, useEffect」をつかいます
*「 wp.element」にはReactコンポーネントに対応するWordPressコンポーネントがあります
2:「URLInput」は「任意のURLを入力」または「投稿を検索して選択」ができます
3:「Dashicon・ Button」はアイコン用です
*Buttonでアイコンをつかうときは「@wordpress/element」からアイコンをインポートしてつかいます
(Buttonコンポーネントは、label属性でツールチップが表示され便利ですlabel={“”})
import { registerBlockType } from '@wordpress/blocks';
import { useBlockProps, URLInput } from '@wordpress/block-editor';
import { TextControl, Dashicon, Button } from '@wordpress/components';
import { plus, trash} from '@wordpress/icons';
import { useState, useEffect } from '@wordpress/element';
import './style.scss';
import './editor.scss';

registerBlockType('create-block/social', {
    edit({ attributes, setAttributes, isSelected }) {
        const { social } = attributes;
        const blockProps = useBlockProps();
        //クリックしたアイコンのインデックスをStateで管理
        const [iconIndex, setIndex] = useState(null);
    //ブロックが選択されているとき(ライフサイクルのアップデートを確認)
    useEffect( () => {
        if ( ! isSelected ) {
            setIndex(null);
        }
    }, [isSelected]);
    //socialの更新する関数
    function updateSocialItem(type, val) {
        let newSocial = [...social];
        newSocial[iconIndex][type] = val;
        setAttributes({ social: newSocial });
            };
    //socialから選択したアイコンを削除する関数
    function remonveSocialItem(e) {
//クリックのデフォルトの動きを止める
        e.preventDefault();
        setAttributes({ social: [...social.slice(0, iconIndex), ...social.slice(iconIndex + 1)] });
        setIndex(null)
            };

return (
    <div { ...blockProps }>
    <ul>
        {social.map((item, index) => {
        return (
            <li key={index}>
                {/* is-selectedクラスをつける */}
                <Dashicon
                    icon={item.icon}
                    onClick={() => setIndex(index)}
                    className={iconIndex === index ? "is-selected" : null}
                />
            </li>
            );
        })}
        {/* アイコン追加ボタンをliの末尾に */}
        {isSelected &&
            (<li>
                <Button
                    icon={ plus }
                    label={"追加"}
                    type="button"
                    //オブジェクト{ icon : '', link: '' }を配列に追加
                    //初期値はexternal(リンクのアイコン)
                    onClick={() => {
                        setAttributes({ social: [...social, { icon : 'external', link: '' }] }),
                    //配列の最後を選択
                        setIndex(social.length)
                        }
                    }
                />
            </li>
        )}
        </ul>
{/* //オブジェクト{ icon : '', link: '' }に情報を追加 */}
{iconIndex !== null && (
    <div className={"wp-block-create-block-social__edit"}>
        <TextControl
            label={"ICON"}
            value={social[iconIndex].icon}
            onChange={icon =>updateSocialItem("icon", icon)}
            />
        <URLInput
            label={"URL"}
            value={social[iconIndex].link}
            onChange={link =>updateSocialItem("link", link)}
            />
        <Button
            icon={ trash }
            label={"削除"}
            type="button"
            onClick={ remonveSocialItem }
        />
    </div>
    )}
    </div>
)},

save({ attributes }) {
    const { social } = attributes;
    const blockProps = useBlockProps.save();
return (
    <div { ...blockProps }>
{social.length > 0 && (
    <ul>
        {social.map((item, index) => {
        return (
            <li key={index} data-icon={item.icon}>
                <a
                    href={item.link}
                    target="_blank"
                    rel="noopener noreferrer"
                >
                <Dashicon icon={item.icon} />
                </a>
            </li>
            );
        })}
    </ul>
)}
</div >
);
}

} );
JavaScriptのmap関数をつかいループで「liタグ」を出力
<ul>
{social.map((item, index) => {
 return (
  <li key={index}>
	<Dashicon icon={item.icon}  />
</li>
	);
})}
</ul>
…(スプレッド構文)をつかうと配列をコピーして展開できます
setAttributes( {social: [...social, {icon: '', link: ''}]} )}
useStateについて(選択したアイコンのインデックスを管理します)
stateは値・setStateは値を更新する関数・initialStateは初期値
const [state, setState] = useState(initialState);
*どのアイコンを選択しているかは編集時にだけ必要な情報なので、Stateで管理します
const [iconIndex, setIndex] = useState(null);
//iconIndexをindexの値に更新
onClick={() => setIndex(index)}
useEffectについて
DOMの状態変化などライフサイクルにあわせて実行する処理を「副作用」と呼び、「useEffect」をつかって「副作用」を実行できます
第二引数は配列で、その要素が変化したときだけ副作用を実行します
ブロックが選択されていないとき(DOMの状態変化時)に、アイコンの選択を解除するために必要です
useEffect( () => {
  if ( ! isSelected ) {
	setIndex(null);
  }
}, [isSelected]);
style.scssファイルの編集例
.wp-block-create-block-social {
    padding: 1rem;
    & ul{
        list-style: none !important;
        display: flex;
        & li{
            margin-right: 1.5rem;
            & .dashicon {
                display: inline-block;
                font-size: 2rem;
                }
            & a{
                text-decoration: none !important;
                color: #777;
                &:hover{
                    opacity: 0.7;
                    }
                }
            }
        }
}
editor.scssファイルの編集例w
.wp-block-create-block-social{
    & .dashicon{
        color: #777;
        &.is-selected::before{
        border: solid 1px #C20024;
        }
    }
}

.wp-block-create-block-social__edit{
    padding: 10px 5px;
    border: solid 1px #ccc;
    max-width: 300px;
    & input{
        width: 280px !important;
    }
    & label{
        margin-bottom: 0 !important;;
    }
    & svg{
        fill: #C20024;
    }
}
.block-editor-block-list__block .wp-block-create-block-social__edit .block-editor-url-input input[type=text]{
    padding: 6px 8px;
    box-shadow: 0 0 0 transparent;
    transition: box-shadow .1s linear;
    border-radius: 2px;
    border: 1px solid #757575;
}
ダイナミックブロック
ダイナミックは、投稿の更新が反映するブロックです(最近の投稿一覧など)
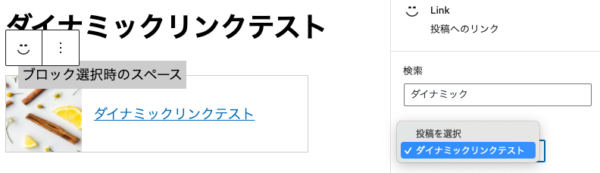
タイトル変更が自動で反映する内部リンク用のブロックを作ります
サイドバーに「SelectControlとTextControl」を表示して、「投稿一覧から」または「キーワード検索から」リンクする投稿記事を選びます
ダイナミックブロックについて
ダイナミックブロックでは「save」は基本的に「null」を返します(レンダリングがサーバ側で実行されます)
データベースには「attributes」のみが保存され、「attributes」はサーバ側レンダリングコールバックに渡されます
*ダイナミックブロック内で「InnerBlocks」をつかっているときは「save」で<InnerBlocks.Content/>を返すします
ブロック名は「create-block/link」にしています
block.jsonファイルの「attributes」に投稿ID用のキー「selectedPostId」を設定します
{
    "$schema": "https://schemas.wp.org/trunk/block.json",
    "apiVersion": 2,
    "name": "create-block/link",
    "version": "0.1.0",
    "title": "Link",
    "category": "design",
    "icon": "smiley",
    "description": "投稿へのリンク",
    "attributes": {
        "selectedPostId": {
            "type":"string",
            "default": ""
        }
    },
    "supports": {
        "html": false
    },
    "editorScript": "file:./build/index.js",
    "editorStyle": "file:./build/index.css",
    "style": "file:./build/style-index.css"
}
PHP
register_block_type関数の第二引数(連想配列)のキー「render_callback」を指定します
*キー(その他の例)’supports’ => array( ‘color’ => true )
function hoge($attributes){
	var_dump($attributes);
	return 'link';
}

function create_block_test_block_init() {
	register_block_type( __DIR__, array(
		'render_callback' => 'hoge',
	));
}
add_action( 'init', 'create_block_test_block_init' );
var_dumpの結果array(2) { ["selectedPostId"]=> string(0) "" }
任意の投稿IDでフロント側に表示を作ってみます(任意の投稿IDは「block.jsonファイルのselectedPostIdのdefaultの値」に設定)
「get_block_wrapper_attributes()」は、属性の文字列を生成します(ラッパー要素に追加します)
function create_block_test_render_link_block($attributes){
//投稿ID
$post_id = $attributes['selectedPostId'];
//htmlレンダリング
$selectedpost = '';
//get_block_wrapper_attributes()ブロックのクラスでラップ
$selectedpost .= '<div '. get_block_wrapper_attributes() .'>';
//投稿IDが空でなければ
if (!empty($post_id)) {
$selectedpost .= '<a href="' . esc_url(get_the_permalink($post_id)) . '">';
//アイキャッチがあれば
if (has_post_thumbnail($post_id)) {
$selectedpost .= '<img src="' . get_the_post_thumbnail_url($post_id, 'thumbnail') . '"
alt=""/>
<p>' . get_the_title($post_id) . '</p>
<span class="dashicons dashicons-arrow-right-alt2"></span>
</a>';
}
else{
$selectedpost .= '<p>' . get_the_title($selectedpost) . '</p>
</a>';
}
//投稿が削除されたとき
} else {
$selectedpost .= '<P class="warning">リンク先の投稿は削除されたようです</P>';
}
$selectedpost .= '</div>';
return $selectedpost;
}
function create_block_test_block_init() {
register_block_type( __DIR__, array(
//render_callbackを指定
'render_callback' => 'create_block_test_render_link_block',
));
}
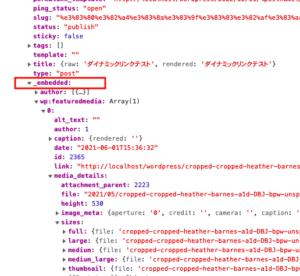
add_action( 'init', 'create_block_test_block_init' );エディタ側JavaScriptでは、サーバにリクエストを送り、投稿を取得します
getEntityRecords関数(@wordpress / core-data)を使用し「REST APIエンドポイント」にデータをフェッチして、コンポーネント内で使用するデータを取得します
useSelectをつかいフックで取得します (WordPressのデータはReduxのStoreのイメージです)
非同期で行われる「getEntityRecords」は、値がまだ受信されていないときは「null」を返すため、読み込み状態により表示する内容を分岐します
「任意の投稿ID」で取得してエディタ側にも表示し、取得したデータをコンソールで確認してみます
import { registerBlockType } from '@wordpress/blocks';
import { useSelect } from '@wordpress/data';
import { useBlockProps } from '@wordpress/block-editor';

registerBlockType('create-block/link', {
    edit({ attributes }) {
    const blockProps = useBlockProps();
//サーバにリクエストを送りIDで指定した投稿のデータを取得
    const link = useSelect(
        (select) => {
            return select('core').getEntityRecords('postType', 'post', {
//任意の投稿ID
                include: "投稿ID",
//_embedはアイキャッチを取得に必要(グローバルなパタメータ)
                _embed: true,
            });
        },[]);
    //コンソールを確認 (オブジェクトの配列が返る)
    console.log(link)
    return (
        <div {...blockProps}>
{/* 読み込みの状態により表示する内容を分岐 */}
            { !link && 'Loading' }
            { link && link.length === 0 && 'No Post' }
            { link && link.length > 0 && (
                <a href={link[0].link}>
                    <img src={link[0]._embedded['wp:featuredmedia'][0].media_details.sizes.thumbnail.source_url} alt="" />
                    <p>{link[0].title.rendered}</p>
            </a>
            ) }
        </div>
        );
    },

//saveはnullを返す
    save() {
        return null;
    },
} );
URLクエリパラメータの例(参照:ハンドブック)
| パラメータ | 説明 |
| include | 取得する投稿ID |
| exclude | 除外する投稿ID |
| per_page | 取得する投稿数 *per_page: -1は全ての投稿 |
| search | 検索クエリ |
| categories | カテゴリーIDで取得 |
| tags | タグIDで取得 |
WordPress内ブラウザのコンソールで最近の投稿10件のデータが確認できます
追記:getEntityRecords は非同期にデータを取得するため、最初の呼び出しでは null が返され、しばらく待ってから再実行するとデータが取得できる
wp.data.select('core').getEntityRecords('postType', 'post')
1:サイドバーで「InspectorControls・PanelBody・SelectControl・TextControl」をつかいます
2:「SelectControl」は「HTMLのinput(select)タグ」のイメージです
label={“ラベル”}
options={ メニューの項目 }
value={ 選択されている値 }
onChange={選択された値を受け取る関数}
options(配列)について「label: メニュー項目・value: 値(選択された値がonChangeに渡されます)」
*検索して結果が1つに絞られたときに「onChange」は反応しません、そのためデフォルトvalueが必要です
3 : 検索キーワードはconst [search, setSearch ] = useState(”)で管理します
またサーバに送るクエリは「search」が空かどうかで条件分岐しました
import { registerBlockType } from '@wordpress/blocks';
import { useSelect } from '@wordpress/data';
import { useState } from '@wordpress/element';
import { useBlockProps, InspectorControls } from '@wordpress/block-editor';
import { PanelBody, SelectControl, TextControl } from "@wordpress/components";
import './style.scss';

registerBlockType('create-block/link', {
    edit({ attributes, setAttributes }) {
        const blockProps = useBlockProps();
        const { selectedPostId } = attributes;
       //検索キーワードの管理
        const [search, setSearch] = useState('');

       //サーバにリクエストを送り投稿のデータを取得
        const posts = useSelect(
            (select) => {
                let query = {};
                if (search === '') {
                    query = { per_page: -1 };
                } else {
                    query = { search: search, per_page: 100 };
                }
                return select('core').getEntityRecords('postType', 'post', query);
            }, [search]);

        const options = [];
        if (posts) {
            options.push({ value: 0, label: '投稿を選択' });
            posts.forEach((post) => {
                options.push({ value: post.id, label: post.title.rendered });
            });
        } else {
            options.push({ value: 0, label: 'Loading...' });
        }

        const link = useSelect(
            (select) => {
                if (selectedPostId) {
                    return select('core').getEntityRecords('postType', 'post', {
                        include: [selectedPostId],
                        _embed: true,
                    });
                }
                return null;
            }, [selectedPostId]);

        return (
            <>
                <InspectorControls>
                    <PanelBody>
                        <TextControl
                            label={"検索"}
                            value={search}
                            onChange={(search) => setSearch(search)}
                        />
                        <SelectControl
                            label={"投稿を選択"}
                            options={options}
                            value={selectedPostId}
                            onChange={(id) => setAttributes({ selectedPostId: id })}
                        />
                    </PanelBody>
                </InspectorControls>

                <div {...blockProps}>
                    <p className='wp-block-create-block-link__space'>ブロック選択時のスペース</p>
                    {!link && 'Loading...'}
                    {link && link.length === 0 && <p className='wp-block-create-block-link__nopost'>No Post</p>}
                    {link && link.length > 0 && (
                        <a href={link[0].link}>
                            {link[0]._embedded && link[0]._embedded['wp:featuredmedia'] &&
                                <img src={link[0]._embedded['wp:featuredmedia'][0].media_details.sizes.thumbnail.source_url} alt="" />}
                            <p>{link[0].title.rendered}</p>
                        </a>
                    )}
                </div>
            </>
        );
    },

    save() {
        return null;
    },
});
*「block.jsonファイルのselectedPostIdのdefaultの値」は"default": ""に戻します
style.scssの例
.wp-block-create-block-link{
    margin-top: 20px;
    margin-bottom: 20px;
    & a{
      display: flex;
      max-width: 400px;
      border: 1px solid #ccc;
        &:hover{
            opacity: 0.7;
            text-decoration: none !important;
        }
      }
    & img{
        width: 100px;
         height: 100px;
    }
    & p{
        align-self: center;
        flex-grow: 1;
        margin: 0 0 0 1rem !important;
        line-height: 1.5 !important;
    }
    & span.dashicons{
        margin: auto 0.5rem;
    }
    &__space{
        position: absolute;
        top: -20px;
        padding: 5px;
        background-color: #ccc;
    }
    &__nopost{
        padding: 20px;
    }
}
参考
- core: WordPressコアデータ
- core/blocks: ブロックタイプデータ
- core/block-editor: ブロックエディターのデータ
- core/editor: 投稿エディターのデータ
- core/edit-post:エディタのUIデータ
- core/notices: 通知データ
- core/viewport: ビューポートデータ
「useSelect・useDispatch」をつかってinputの入力をtitleに反映させる(シンプルな例)
*「useSelect・useDispatch」はWordPressでのReactフックです(withSelectやwithDispatchのようにコンポーネントをラップする必要がありません)
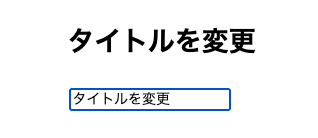
import { registerBlockType } from '@wordpress/blocks';
import { useBlockProps } from '@wordpress/block-editor';
import { useSelect, useDispatch } from '@wordpress/data';

registerBlockType('create-blocks/store', {
    edit(){
    const title = useSelect((select) => {
        return select('core/editor').getEditedPostAttribute('title');
    });
    const { editPost } = useDispatch('core/editor');
    return (
        <div {...useBlockProps()}>
            <h2>{title}</h2>
            <input
                value={title}
                onChange={(e) => editPost({ title: e.target.value })}
            />
        </div>
    );
    },
    save(){}
});