*Firebase(V9)ではモジュールバンドラを利用して、必要なものだけインポートします
手順
- Firebaseプロジェクト作成
- アプリの登録
- アプリでFirebaseを初期化
- Firebaseアプリオブジェクトを作成
Firebaseプロジェクト作成
*プロジェクトの一意のID が生成されます
同じ「Firebaseプロジェクト」に登録されている「Firebaseアプリ」は、「Firebase Hosting」「Authentication」「Realtime Database」「Cloud Firestore」「Cloud Storage」「Cloud Functions」 など同じバックエンドを共有します
- Firebaseコンソールから「プロジェクトを追加」 をクリック、名前をつけます
- Google アナリティクスを設定(*省略可)
注意:実際に作成されるのはGCP(Google Cloud Platform)のプロジェクトです
FirebaseのプロジェクトとGCPのプロジェクトは連動しています
Sparkプラン(Firebaseの無料プラン)を選んでいるときは、GCP側のプロジェクトも非課金プロジェクトとして作成されます
*ちなみに、Sparkプランの無料の割り当て制限を超えた場合、その月の残りの期間はプロジェクトは停止されます
アプリの登録
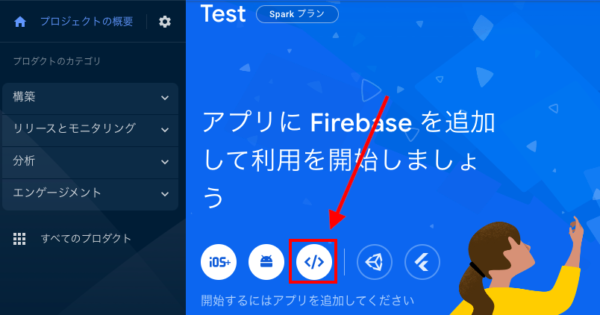
名前をつけて「コンソールに進む」をクリック
SDKインストール
*モジュールバンドラや JavaScriptフレームワークツールを利用(省略)
npm install firebaseアプリでFirebaseを初期化して、Firebaseアプリオブジェクトを作成します
*初期化すると、Firebaseサービス(Cloud Firestore・Authentication・Cloud Storageなど)を追加して使用できます
// 必要な機能をインポート
import { initializeApp } from "firebase/app";

// Your web app's Firebase configuration
const firebaseConfig = {
  apiKey: "・・・",
  authDomain: "・・・",
  projectId: "・・・",
  storageBucket: "・・・",
  messagingSenderId: "・・・",
  appId: "・・・"
};

// Firebaseを初期化
initializeApp(firebaseConfig);
ちなみに、アプリの設定からコピーできます
またアプリの削除やプロジェクトの削除ができます
*注意:プロジェクトが完全に削除されるまで30日かかり、Sparkプラン(無料プラン)はプロジェクト数は通常は約 5~10に制限されているので、テストで何度も削除するときは要注意
FirebaseのAPIキーなどは公開情報です
クライアントがデータに直接アクセスできるため、本番環境では「セキュリティルール」を使用し、「Cloud FirestoreやCloud Storage」のデータを保護します
*セキュリティルールはドキュメント単位なので特定のフィールドだけに適応はできません
match /databases/{database}/documents:Firestore内のすべてのルート
{document=**} :のワイルドカード表記(データベース全体の任意のドキュメント)なので全てのデータallow read, write: if true :すべての読み書きを許可
rules_version = '2';
service cloud.firestore {
  match /databases/{database}/documents {
    match /{document=**} {
      allow read, write: if
          request.time < timestamp.date(2022, 8, 14);
    }
  }
}
サインインしているユーザーに全てのデータの読み書きを許可
  match /{document=**} {
            allow read, write: if request.auth != null;
        }
例えば、データベースのルートにusersというコレクションを定義し、その中にユーザーIDに一致するドキュメントに対して、そのユーザーだけにデータの読み書きを許可する場合
*request.authは認証情報
*resource.dataはドキュメントに格納されているすべてのフィールドと値のマップ
match /users/{userId} {
   allow read, write: if request.auth != null && userId == request.auth.uid
  }

match /hoge/{id}{
     allow read, write: if request.auth != null && resource.data.userId == request.auth.uid
}APIキーの制限について
本番環境では、APIキーに制限(提供したウェブサイトのリストからのみリクエストを受け入れる)をつけることができます
認証情報パネルを開き、プロジェクトを検索して、認証情報から「APIキー」選択、「制限タイプ」を「HTTP リファラー」にして「項目追加」でアプリのURLを登録、[保存] をクリックします
*「hoge.web.app/*」はhoge.web.app/ではじまるすべてのサイト
Cloud Firestore
無料枠は、プロジェクトあたり1GB のストレージ
データベースには、「Cloud Firestore」と「Realtime Database」があります
「Cloud Firestore」 は「Realtime Database」より高速なクエリと高性能なスケーリングです
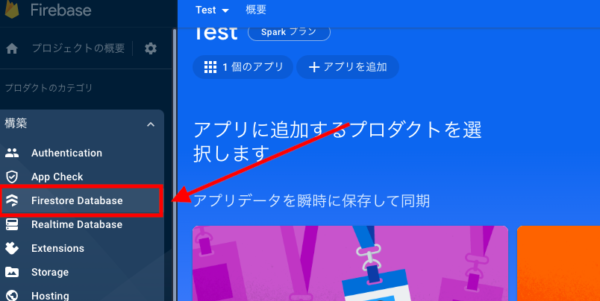
データベースを作成する
- セキュリティルールの開始モードを選択します
開発中は、「テストモード」を選択し、本番環境にデプロイ前にセキュリティルールを更新します - リソースロケーションの選択(まだ選択していない場合)
「asia-northeast1 東京・asia-northeast2 大阪」があります
念の為:Blazeプラン(課金プラン)の場合、Cloud Storage(画像のアップロード)で無料プログラム「Always Free」(5GB /月の Regional Storage)を利用できるのは「 us-east1・us-west1・us-central1」 リージョンのみです
「Cloud Firestore・ Cloud Storage」のどちらかを使い始めると、プロジェクトのデフォルトのGoogle Cloud Platform(GCP)リソースロケーションを選択が求められます
プロジェクトのデフォルトの GCPリソース ロケーションをいったん設定すると、変更できません
「Cloud Firestore・Cloud Storage・Google App Engine」の同じプロジェクトは、デフォルトのGCPリソースロケーションを共有し、次のいずれかのサービスでロケーションを設定すると、他のサービスのロケーションも設定されます
データはドキュメントのコレクションとして保存します
*コレクションはドキュメントのコンテナです

Cloud Firestore データモデルについて(*特記事項のみ)
- データ型
map:ドキュメント内に埋め込まれたオブジェクト
reference:パスそのものを保持する 例: projects/[PROJECT_ID] - ドキュメントには「サブコレクション」や「ネストされたオブジェクト」を格納できます
サブコレクションとは、ドキュメント内に追加するコレクションです(データを階層的に構造化)
同じコレクションIDを持つ複数のサブコレクションに対してクエリを実行できます
*ドキュメントを削除しても、そのドキュメント内のサブコレクションは削除されません
ドキュメントまたはコレクションへのパスを文字列として指定、スラッシュ「/」で区切ってリファレンスを作成できます
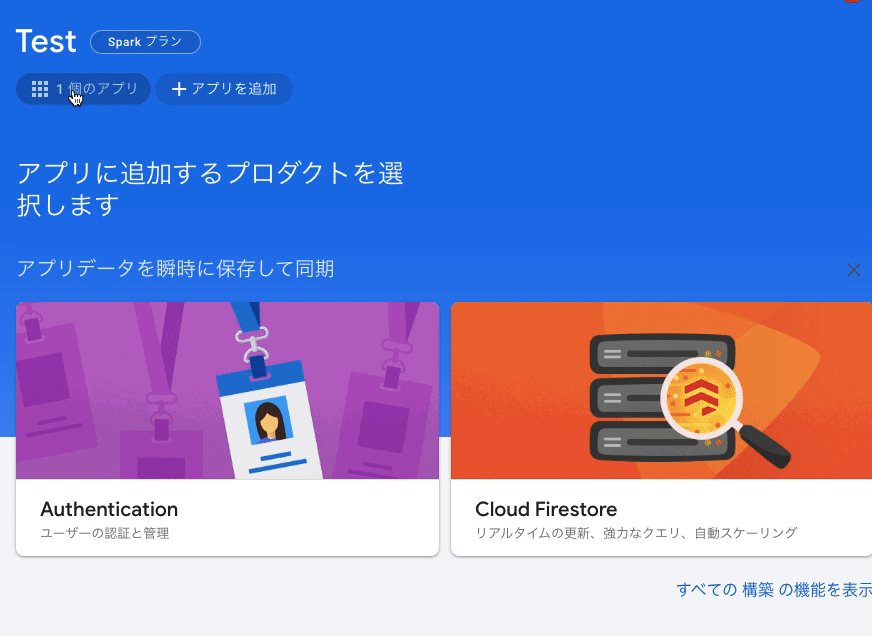
アプリに「Firestore」を追加します
* Firestore Liteについて: リアルタイムストリーミングを使わないときは「Firestore Lite」にすると軽量化できます
import { getFirestore } from "firebase/firestore";
//Firestore Liteの場合
import { getFirestore } from '@firebase/firestore/lite';
コレクションへの参照を取得 collection()
addDoc()を利用して、新しいコレクション(例:users)とドキュメントを作成
識別子は自動的で生成
*コレクション内のドキュメントには、異なる情報のセット(keyとvalue)を含めることもできます
import { getFirestore, collection, addDoc } from "firebase/firestore";
//Cloud Firestoreを初期化し、サービスへの参照を取得
const db = getFirestore();
try {
  const docRef = await addDoc(collection(db, "users"), {
    name: "花子",
    age: 20
  });
  console.log(docRef.id);
} catch (e) {
  console.error(e);
}
コレクションやドキュメントが存在しない場合は作成され、コレクション内のすべてのドキュメントを削除すると、コレクションも削除されます
注意:以降 const db = getFirestore();は省略しています
getDocs()でデータを取得します
import { collection, getDocs } from "firebase/firestore";

getDocs(collection(db, "users"))
  .then(snapshot => {
    let users = []
    snapshot.docs.forEach(doc => {
      users.push({ ...doc.data(), id: doc.id })
    })
    console.log(users)
  })
  .catch(err => {
    console.log(err.message)
})クエリオブジェクトを作成、getDocs()で結果を取得します
import { collection, getDocs, query, where } from "firebase/firestore";

//usersコレクションからageが20のusersを返します
const q = query(collection(db, "users"), where("age", "==", 20));
//結果を取得
await getDocs(q)
  .then(snapshot => {
    let users = []
    snapshot.docs.forEach(doc => {
      users.push({ ...doc.data(), id: doc.id })
    })
    console.log(users)
  })
  .catch(err => {
    console.log(err.message)
})リアルタイムデータを取得する場合(Firestore Liteは利用できません)onSnapshot() を使用してドキュメントをリッスンします(データの書き込み→データをリスナーに通知→データをバックエンドに送信)
コールバックを使用して、すぐにドキュメントスナップショットが作成されます
*リッスンする必要がなくなったら、コールバックが呼び出されないようにリスナーを停止
import { collection, onSnapshot } from "firebase/firestore";

const unsubscribe = onSnapshot(collection(db, "users"),  (snapshot) => {
  let users = []
  snapshot.docs.forEach(doc => {
    users.push({ ...doc.data(), id: doc.id })
  })
  console.log(users)
});

// Stop
unsubscribe();
単一ドキュメントへの参照を取得 doc()
setDoc()・doc()を利用して、単一のドキュメントを作成または上書きします
この場合は、ドキュメントIDを指定する必要があります
ドキュメントが存在しない場合は、ドキュメントは新規に作成されます
ドキュメントが存在する場合、コンテンツが上書きされます()
*マップを含むドキュメントの場合は空のマップを含むフィールドをセットするとドキュメントは上書きされます
import { doc, setDoc, Timestamp } from "firebase/firestore";

const data = {
    name: "太郎",
    age:30,
    date: Timestamp.fromDate(new Date()),
};
//usersコレクションに、ドキュメントIDはnew-users-id
await setDoc(doc(db, "users", "new-users-id"), data);getDoc()で、単一のドキュメントを取得する
import { doc, getDoc } from "firebase/firestore";

getDoc(doc(db, 'users', 'new-users-id'))
.then((doc)=>{
 console.log(doc.data(), doc.id)
})updateDoc()で、シングルドキュメントの一部のフィールドを更新します
import { doc, updateDoc } from "firebase/firestore";

await updateDoc(doc(db, "users", "new-users-id"), {
  "age": 25
});deleteDoc()は、ドキュメントを削除するために使用します
import { doc, deleteDoc } from "firebase/firestore";

//dataコレクションのoneドキュメントを削除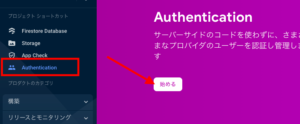
await deleteDoc(doc(db, "users", "new-users-id"));Firebase Authentication
*FirebaseUIではありません
Firebase Authenticationを利用するとユーザー認証機能を独自で実装する必要がありません
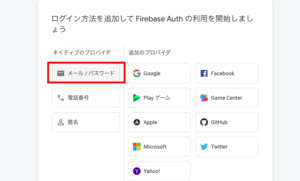
さまざまの認証方法が提供されています
ぼほ無料で利用できます(電話番号認証は従量課金)
import { getAuth } from "firebase/auth";

const auth = getAuth();
createUserWithEmailAndPassword() を使用して、メールアドレスとパスワードでユーザーを登録する
import { getAuth, createUserWithEmailAndPassword } from "firebase/auth";
const auth = getAuth()

const email = 'hogehoge@gmail.com'
const password = 'test1234'

createUserWithEmailAndPassword(auth, email, password)
  .then((userCredential) => {
    console.log(userCredential.user)
  })
  .catch((err) => {
   console.log(err.message)
});updateProfile()を使用して、ユーザーの基本的なプロフィール情報(ユーザーの表示名とプロフィール写真の URL)を更新できます
import { getAuth, createUserWithEmailAndPassword, updateProfile} from "firebase/auth";
const auth = getAuth()

const email = 'hogehoge@gmail.com'
const password = 'test1234'
const displayName = '花子'

createUserWithEmailAndPassword(auth, email, password)
 .then((userCredential) => {
  console.log(userCredential.user),
  updateProfile(userCredential.user, {displayName: displayName})
  })
.catch((err) => {console.log(err.message) })signOut()を使用して、ログアウトします
import { getAuth, signOut } from "firebase/auth";
const auth = getAuth()

signOut(auth)
   .then(() => {
     console.log('ログアウトしました')
   })
   .catch(err => {
    console.log(err.message)
})signInWithEmailAndPassword()を使用して、既存のユーザーでログインします
import { getAuth, signInWithEmailAndPassword } from "firebase/auth";
const auth = getAuth();

const email = 'hogehoge@gmail.com'
const password = 'test1234'

signInWithEmailAndPassword(auth, email, password)
  .then((userCredential) => {
   console.log(userCredential.user)
  })
  .catch((err) => {
    console.log(err.message)
  });
onAuthStateChanged() : 認証状態オブザーバーを設定してアプリで認証状態をチェックします
*オブザーバーは、ユーザーのログイン状態が変わるたびに呼び出されます
import { getAuth, onAuthStateChanged } from "firebase/auth";

const auth = getAuth();
onAuthStateChanged(auth, (user) => {
  if (user) {
    console.log(user.uid)
  } else {
    console.log('ログアウトしました')
  }
});
Cloud Storage
*Blazeプラン(課金プラン)で無料プログラム「Always Free」(5GB /月の Regional Storage)を利用できるのは「 us-east1・us-west1・us-central1」 リージョンのみです
Regional Storage:特定の地域から頻繁にアクセスされるデータの保存
データはGoogle Cloud Storageバケットに格納されます
画像や動画をアップロードし、アップロードした画像のURLをデータベース(Cloud Firestoreなど)に保存
ファイルの「アップロード・ダウンロード・削除・メタデータを取得や更新」はファイルへの参照を作成する必要があります
import { getStorage, ref } from "firebase/storage";
//ストレージサービスへの参照
const storage = getStorage();

//ファイル(images/hoge.jpg)への参照を作成
const hogeRef = ref(storage, 'images/space.jpg');
余談:Vue.jsのComposition APIで「ref」を使う時は、firebase/storageでは「ref as fref」など別名でインポート
- parentプロパティ(hogeRef.parent)で、1つ上に移動・
- rootプロパティで最上位(hogeRef.root)に移動できます
- fullPathプロパティはファイルのフルパス
- nameプロパティはファイル名を取得します
「Cloud Storage」のファイル操作は、デフォルトでは「Firebase Authentication」が必要です
認証されていないアクセスを許可するにはCloud Storageのセキュリティルールを変更します
if request.auth != null;の部分をif true;

HTMLのinputタグのtypeをfileからアップロードするファイル名を取得uploadBytes()で、画像をアップロードして、getDownloadURL()で、ファイルのパスを取得します
<input type="file" id="file">import { getStorage, ref, uploadBytes, getDownloadURL } from "firebase/storage";
//inputタグに、onchangeでファイルが選択された際の処理を指定しています
let fileInput = document.getElementById('file');
fileInput.onchange = (e) => {
const file = e.target.files[0]
//ランダム文字列をプラス(おまけ)
const S ="abcdefghijklmnopqrstuvwxyzABCDEFGHIJKLMNOPQRSTUVWXYZ0123456789";
const N = 16;
const randomChar = Array.from(crypto.getRandomValues(new Uint32Array(N)))
.map((n) => S[n % S.length]).join("");
const fileName = randomChar + "_" + file.name;
const storage = getStorage();
//ファイルへの参照
const storageRef = ref(storage, fileName);
uploadBytes(storageRef, file)
.then(() => {
return getDownloadURL(storageRef)
})
.then((res) => {
console.log(res)
})
.catch((err) => {
console.log(err.message)
});
};備考(便利な関数)
ランダム文字列を作る
 function randomChar(num){
    const S ="abcdefghijklmnopqrstuvwxyzABCDEFGHIJKLMNOPQRSTUVWXYZ0123456789";
    return Array.from(crypto.getRandomValues(new Uint32Array(num))).map((n) => S[n % S.length]).join("");
  }
一意な識別子の生成にライブラリ(Nano ID)を使う
npm i nanoid
import { nanoid } from 'nanoid'
model.id = nanoid() //=> "V1StGXR8_Z5jdHi6B-myT"deleteObject()で、アップロードしたファイルを削除します
import { getStorage, ref, deleteObject } from "firebase/storage";

const storage = getStorage();
const desertRef = ref(storage, '削除するファイルのパス');

deleteObject(desertRef)
.then(() => {
  console.log('削除されました')
}).catch((err) => {
  console.log(err)
});